Installing a heat pump system usually takes a full day for a simple replacement and longer for new ductwork, electrical work or line-set changes. It is not a DIY job for most homeowners; the refrigerant work, 240 V wiring and startup should be handled by a licensed HVAC pro.
A basic swap can look simple from the hallway. The part you can see is only the cabinet; the part that causes trouble is the wiring, refrigerant circuit and airflow setup behind it.
One number changes the whole job: a standard plug-in heater tops out around 1,500 W, but a whole-home heat pump is sized and installed around duct capacity, breaker size and load calculations. Get those wrong and the system runs, just badly.
Key takeaways
Measure the house load before you pick equipment, or you’ll buy the wrong size.
Plan for licensed refrigerant and electrical work on most installs.
Check clearances, breaker size and condensate drainage before the first screw goes in.
Use the included line set, disconnect and surge protection only if they match the install plan.
Call for permits before you open walls or touch the panel.
Installing a Heat Pump System Step by Step
Installing a heat pump system means sizing the equipment, placing the indoor and outdoor units, connecting approved refrigerant lines and wiring, then evacuating, charging and testing the system. A straightforward replacement may fit into one workday, while new ductwork, a longer line set or an electrical upgrade can stretch the job across several days, so most homeowners should leave the refrigerant circuit, 240 V wiring and startup to a licensed HVAC professional.
The basic sequence is the same for a ducted air-source heat pump or a compatible split system, but the details depend on the load calculation, existing ductwork, line-set length and electrical panel. A useful estimate for the installation cost should separate equipment, labor, permits, electrical work and any duct repairs; see our guide to cost of installing a heat pump before comparing quotes.
Answer The Floor Heating Questions First
A standard air-source heat pump with an indoor air handler does not connect directly to floor tubing. Floor heating system installation needs either electric resistance cable or a hydronic system with water tubing, a manifold, circulator, controls and a heat source designed to heat water.
For installing a hydronic floor heating system, the installer places tubing under or within the floor, connects each loop to a manifold, adds the required pump and temperature controls, and verifies flow before covering the work. How to install a floor heating system depends heavily on the floor construction; cutting into a finished floor without a tubing layout is a fine way to find a leak the expensive way.
A tankless water heater can serve some hydronic heating systems, but installing a house heating tankless heating system is a separate plumbing and controls project, not a shortcut for installing a regular heat pump. The tankless unit must be rated and configured for the loop, with proper flow, temperature control and venting where applicable.
1
Size The System
Start with a room-by-room heat-loss calculation rather than matching the old furnace’s nameplate. The result determines the heat pump capacity, backup heat size, duct requirements and likely operating cost. Oversizing can cause short cycles and poor humidity control; undersizing can leave the backup heater working through cold weather.
2
Set The Indoor And Outdoor Units
The indoor air handler or coil needs service access, a level mounting surface and a condensate route. The outdoor unit needs a stable base, clearance for airflow and a location that won’t dump defrost water onto a walkway or foundation. Follow the equipment listing and installation manual for clearances instead of relying on a generic number.
3
Run Lines And Wiring
The installer routes the correctly sized refrigerant line set, communication or control wiring, condensate piping and power conductors. The line set should be protected from damage, supported properly and kept within the manufacturer’s length and elevation limits. Electrical work includes the correctly sized circuit, disconnect and grounding; a 240 V circuit is not a safe place for trial and error.
4
Evacuate, Charge And Test
After pressure testing for leaks, the technician evacuates the refrigerant circuit with a vacuum pump, confirms the vacuum holds, and charges the system by the manufacturer’s procedure. Startup checks include supply and return temperatures, airflow, operating pressures, defrost operation, thermostat staging, condensate drainage and backup heat.
Worked Example
Say the replacement system calls for a 30-amp, 240 V circuit and the line set must run 30 feet through an attic. The breaker, conductors and disconnect must be selected for the equipment’s nameplate and local code, while the line set must stay within the manufacturer’s permitted length and elevation. A longer route can add labor, insulation protection and refrigerant-charge work; it isn’t just a matter of buying extra copper.
Electrical supply240 V equipment circuit
Line-set route30 ft example
Checks that matterNameplate, length, elevation and airflow
Airflow matters just as much as the outdoor unit’s capacity. A dirty filter, undersized return or crushed duct can reduce delivered heat even when the compressor is working correctly. During startup, ask the technician to record the airflow or the measurements the manufacturer requires, along with the condensate and defrost checks.
Have These Ready For The Installer
Equipment model numbers and installation manuals
Outdoor pad or approved mounting hardware
Matched indoor coil or air handler
Correct refrigerant line set and fittings
Thermostat and control wiring
Electrical disconnect and code-approved circuit components
Condensate drain materials and a safe drain route
Filter, return-air access and service clearance
Permit details and the electrical panel information
Stop Before Hands-On Work
Turn off power at the disconnect and panel before opening equipment, but don’t treat that as permission to work inside the cabinet. Refrigerant can cause frost injury and must be recovered, evacuated and charged with proper equipment; 240 V wiring can kill you even when a thermostat appears off. Use a licensed HVAC technician for the refrigerant side, electrical connections and startup, and don’t vent refrigerant or bypass a safety control.
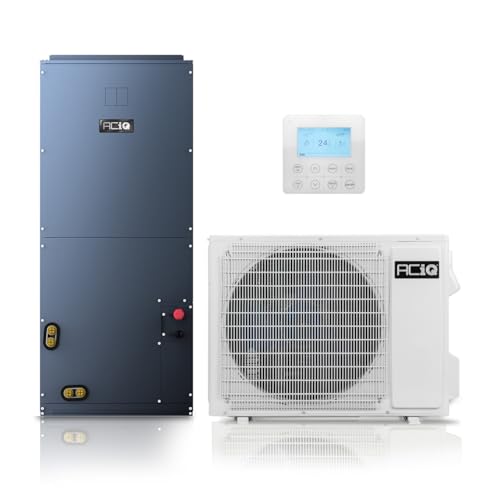
If the proposed system needs a matched 30-foot line set and an included disconnect or backup heat kit, product 1 may fit that particular layout, but the technician still has to confirm capacity, electrical requirements, line-set limits and local code before ordering.
If your layout needs a 30-foot matched l
ACiQ Essentials 3 Ton 17 SEER2 Central AC Heat Pump System
Product 1 includes a 3/8-inch by 5/8-inch line set, a disconnect, a smart thermostat and optional backup heat equipment. It doesn’t replace the load calculation or confirm that its electrical and line-set requirements suit your house.
Keep the model numbers, measured airflow, refrigerant charge information, thermostat settings and electrical readings with the warranty papers. Those details make the first winter service call much less detective work.
In short
Plan the install around the home’s heat loss, ductwork, line-set route and electrical panel. Let a licensed pro handle refrigerant, 240 V wiring and startup, even if the equipment arrives in a box that looks determined to tempt you.
Check Permits And Call A Licensed Pro
Check the permit path before ordering equipment, then hire a licensed HVAC professional for the heat pump installation. Local rules decide which permits, inspections and licenses apply, so your building department is the final word—not the equipment box, which has never met your town’s code officer.
Permits are often required for 240 V electrical work, structural changes and placing the outdoor unit. A new pad, wall penetration, service-panel upgrade or refrigerant line route can each change the approval path. Ask the contractor to list the permit numbers, inspection stages and who schedules the final inspection in the written quote.
Gas And Water Heating Approvals
A gas-powered heating system usually needs a mechanical or building permit, a gas permit, venting approval and an inspection; the exact combination varies by jurisdiction. Gas piping, combustion venting and startup testing belong to licensed professionals in most places. Installing a water heating system can also require plumbing, electrical or gas permits. A tankless water system has no single honest installation price: the quote should separate the heater, labor, permits, venting or gas-line changes, electrical work and any panel upgrade.
An electric tankless hot water system needs the circuits, breaker capacity, wire size and disconnect specified by the manufacturer, along with enough service capacity in the house. That is a licensed electrician’s job in most places. A plumber handles the water connections, relief components and leak check; don’t improvise a 240 V connection beside a sink.
Three Licensed Trades May Be Involved
Refrigerant handling, 240 V wiring and gas work belong to licensed pros in most places. Keep the permit records and inspection approvals, and require the contractor to complete the manufacturer’s startup paperwork. A load calculation may be needed to verify that the electrical service and equipment match the house, and that paperwork can matter for warranty registration.
Before the outdoor unit goes down, check HOA rules, property-line setbacks and local noise limits. An HOA may control visible equipment or screening, while the building department controls placement and clearances; getting a concrete pad poured first is an expensive way to discover both.
In short
Call the building department and utility or gas authority before work starts, then get a written scope from licensed HVAC, electrical and plumbing professionals as needed. For a heat pump, keep the load calculation, permit approvals and completed startup record with the equipment documents.
Avoid The Mistakes That Cause Leaks And Breakdowns
Radiant floor heating is a separate installation from a heat pump: electric cable or mats go beneath an approved floor finish, while water-heated floors use tubing connected to a manifold and boiler or heat pump. Installing heated flooring in an existing room may require removing the floor or using an approved overlay system; follow the cable, mat or tubing maker’s layout, floor-temperature limits and electrical or plumbing requirements.
An electric mat floor heating installation is usually the least invasive option, but don’t cut the heating wire, place it beneath fixed cabinets, or cover it before testing resistance. Water heated in-floor systems need proper tubing spacing, manifold balancing, pressure testing and protection against leaks. A licensed electrician or plumber should handle the circuit, controls, water connections and any heat-pump tie-in that local code requires.
Install point
What goes wrong
What to check
Line set
An undersized, overlong or badly routed line can reduce capacity and strain the compressor.
Match diameter, length and vertical limits to the equipment manual.
Flare or braze joints
A poor joint leaks refrigerant and can let moisture into the system.
Joints should be made, supported and leak-tested by the installer.
Condensate drain
Missing slope or the wrong trap can send water into a wall, ceiling or floor.
Confirm the drain route, trap and termination before the cabinet closes.
Outdoor unit pad
A weak or tilted pad causes vibration, noise, ice buildup and poor drainage.
Use a stable, level support with room for water to leave.
Airflow
Blocked registers, a cramped cabinet or a dirty return starves the blower and coil.
Keep supply and return paths open and follow cabinet clearances.
Do Not Skip The Startup Tests
The installer should evacuate the refrigerant circuit with a vacuum pump, perform a pressure or leak test as specified, and set the charge using the manufacturer’s procedure. Opening the valves and declaring victory leaves moisture or a slow leak hiding in the system; the compressor usually sends the bill later.
Myth
A little tilt under the outdoor unit won’t matter.
Fact
A tilted unit can vibrate, drain meltwater toward the building and let ice collect where the fan or coil needs clear space. Level the support, keep the coil clear, and make sure defrost water has a safe path away from the foundation and walkways.
Photograph Before Closing The Walls
Take wide and close photographs of every wall opening, drain, wire, refrigerant line and line-set route before insulation or drywall covers them. Include a tape measure or a nearby fixed feature for scale, then save the photos with the equipment model and installation date.
From HeaterGuides · our own guideHeating System Upgrade PlannerChoose between a heat pump, a furnace, a boiler or a hybrid with your own numbers, and hire the right installer.Every system compared side by side25 questions for contractors, red flagsRunning-cost, payback and quote calculator (Excel)$14.99$9.99Get it for $9.99See what's inside and watch the 2-minute video →16-page printable PDF + Excel calculator · instant download · 30-day refund
What To Do Next For Your House
Your next order
To install a heat pump system, confirm the heating and cooling load, inspect the ducts, collect permit requirements, choose compatible equipment, book a licensed installer, then schedule startup and inspection. A failed furnace needs a faster decision before the first cold snap; a remodel can often wait until the floor plan, insulation and electrical work are settled.
Start by checking whether the existing ductwork is sealed, large enough and supplied with adequate return air. An air-conditioning system can often use existing heating ducts, but the installer must verify airflow, cabinet fit, insulation and registers rather than assuming the old furnace layout is suitable. For background on heat pumps for home hvac, see heat pumps for home hvac.
1
Confirm the house
Gather recent utility information, note cold rooms, and have the load and duct condition assessed.
2
Confirm the rules
Ask the building department about permits, electrical requirements, setbacks, inspections and any refrigerant or outdoor-unit restrictions.
3
Choose and book
Select equipment that matches the load, then reserve a licensed HVAC installer before the busy winter queue forms.
4
Schedule startup
Leave time for evacuation, leak checks, charge verification, thermostat setup and the final inspection.
Planning can pause for a remodel if framing, insulation or finished-floor height will change; choosing equipment too early can make the duct and electrical plan awkward. A failed furnace, an unheated nursery or a house with no backup heat deserves an assessment and installation booking now. Compare the optimal seasons for heat pump installation revealed before scheduling if the system still runs.
If you’re replacing a failed furnace, call for a load calculation and duct inspection first, then request an installation date. If you’re adding heat during a remodel, finish the room layout and insulation plan, then ask about how to install a geothermal heating system if ground-loop work is practical for the property.
Frequently Asked Questions
How long does it take to install a heat pump system?
A straightforward replacement often takes one working day. New ductwork, a changed line set, panel upgrades or inspection delays can extend the job to several days. Ask the contractor what remains if weather prevents outdoor work.
Can a homeowner install a heat pump system alone?
Most homeowners shouldn’t install the system alone. Refrigerant handling, evacuation, 240 V wiring and commissioning require specialized tools and may require licensing; a homeowner can usually handle only site preparation allowed by local code.
Do I need a permit to install a heat pump?
Many jurisdictions require mechanical, electrical or building permits for a heat pump installation. Your local building department or contractor can confirm the exact path before equipment is ordered, since requirements vary by location and system type.
What electrical work does a heat pump need?
A central heat pump commonly needs a dedicated 240 V circuit, an outdoor disconnect and wiring sized from the equipment nameplate. Electric auxiliary heat can require additional circuit capacity, so have an electrician check the service panel before installation.
Can a heat pump use my existing ductwork?
Existing ducts can work if they are large enough, reasonably sealed and supplied with adequate return air. A contractor should check airflow and static pressure; leaky or undersized ducts can leave rooms cold even when the heat pump itself is operating correctly.
What causes leaks after a heat pump installation?
Refrigerant leaks usually come from poorly made flare or brazed connections, damaged tubing or vibration at the line set. Water leaks more often point to a blocked, poorly sloped or disconnected condensate drain, so identify which fluid is leaking before service begins.
When should I install a heat pump before winter?
Spring or early fall gives the installer more scheduling room and lets you find comfort or control problems before severe cold arrives. Plan earlier if the job needs a panel upgrade, new ducts or a permit inspection, since those can add waiting time.
Before you go · a welcome giftGet the Heating System Upgrade Planner for $4.99Choose between a heat pump, a furnace, a boiler or a hybrid with your own numbers, and hire the right installer. Normally $14.99; your welcome price saves $10.00. We'll email your link right now.One email with your link now. We never share your address.
 Heating System Upgrade PlannerChoose between a heat pump, a furnace, a boiler or a hybrid with your own numbers, and hire the right installer.Every system compared side by side25 questions for contractors, red flagsRunning-cost, payback and quote calculator (Excel)