How to Self Install a Tankless Water Heater Safely and Efficiently
Joye
September 17, 2026 14 min read
Short answer
Self installing a tankless water heater involves plumbing, gas or electrical work, and venting. It can take 6 to 10 hours for a skilled DIYer. Permits and local codes often require a licensed pro, but careful homeowners can do it themselves with the right tools and steps.
Tankless water heaters provide on-demand hot water without storage tanks, boosting energy efficiency and lasting over 20 years. Installation requires upgrading gas lines or electrical circuits, setting up new venting, and meeting code requirements.
This guide breaks down the self installation process, highlights essential tools, safety warnings, common mistakes, and when to call a professional or pull permits.
What to remember
Gas tankless water heaters often need a larger gas line to supply their higher BTU demand.
Venting for tankless units differs from traditional tanks and must follow manufacturer specs and local code.
Permits are usually required, and some jurisdictions mandate licensed professionals for gas or electrical work.
Sizing depends on your household’s peak flow rate in gallons per minute (GPM) to ensure sufficient hot water.
Regular maintenance includes scale prevention and checking the pressure relief valve for safe operation.
How to Self Install a Tankless Water Heater
You can install a tankless water heater yourself by carefully following these step-by-step instructions, covering shutoff, removal, mounting, connections, venting, and testing. Whether you have a gas or electric model, installing inside requires attention to local codes, permits, and safety, but the process is straightforward with the right tools.
This tankless water heater is ready for efficient installation.
1
Shut Off Water, Gas, and Power
Turn off the main water supply to your house, then shut off the gas supply valve if using a gas heater, or switch off the electrical breaker for an electric unit. Confirm no power or gas flow before proceeding to avoid hazards.
2
Remove the Old Water Heater Safely
Drain the old tank completely through its drain valve, then disconnect water lines using proper wrenches. For gas units, carefully detach the gas line connection, and for electric, disconnect wiring at the breaker panel. Dispose or store the old unit following local regulations.
3
Upgrade the Gas Line if Needed
Tankless gas heaters demand higher BTUs, so check if your existing gas line can supply enough volume; this often means replacing a 1/2 inch line with 3/4 inch black iron pipe or yellow flex line rated for your heater’s input. Calculating BTU demand vs. pipe capacity ensures safe operation.
4
Install the New Venting System
Unlike traditional tanks, tankless gas heaters require special stainless steel or PVC venting rated for high-temperature exhaust. Measure and cut vent pipes to minimize bends, sealing joints with manufacturer-approved tape or clamps to prevent leaks.
5
Mount the Tankless Unit
Use a sturdy wall or frame capable of supporting the unit’s weight, typically 30 to 50 pounds. Follow the manufacturer’s mounting template and maintain required clearances to combustibles and airflow openings.
6
Connect Water Supply Lines
Attach cold water inlet and hot water outlet lines using 3/4 inch fittings, adding shutoff valves on both sides for serviceability. Install a pressure relief valve on the hot water outlet if your model doesn’t include one.
7
Connect Gas or Electrical Supply
For gas units, connect the upgraded gas line with proper fittings, checking all joints for leaks with a soap solution. For electric models, connect to a dedicated 240 V circuit breaker sized for your heater’s amperage, following wiring diagrams exactly.
8
Test and Adjust Temperature
Turn water, gas, or power back on, then run hot water through a faucet to verify operation. Adjust the digital or analog temperature control to your desired setting, usually 120°F for safe, comfortable use.
Safety Warning
Never skip shutting off power or gas before disconnecting the old heater. Gas leaks or electrical shocks can cause severe injury or death. If you detect any gas smell or wiring issues, stop and consult a professional.
Tools and Materials Checklist
Adjustable wrench and pipe wrench
Pipe cutter or saw for venting
Pipe thread sealant or Teflon tape
Gas leak detector solution or soapy water
Screwdrivers and drill
Voltage tester for electric connections
Mounting brackets and screws
Shutoff valves for water and gas
Pressure relief valve if not included
Mounting Tip
Mount the unit at eye level or higher for easier access and to keep it away from water splashes or damage. Use the included mounting template to ensure proper positioning.
Connect Electrical Supply Easily
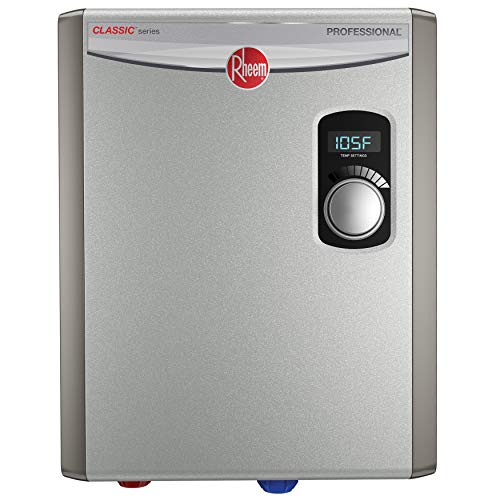
Rheem 18kW 240V Tankless Electric Water Heater
The Rheem 18kW 240V Tankless Electric Water Heater simplifies electrical connections with its threaded 3/4 inch NPT water fittings and clear digital temperature display, making it a good choice for self-installers.
Essentials for a smooth DIY tankless water heater install
Simple install
Rheem 18kW 240V Tankless Electric Water Heater
This Rheem model offers a digital thermostatic control and self-modulation to adjust power based on your hot water demand, making it easy to install and efficient to run in a DIY setup.
NCPYZO 6500W240V Tankless Instant Electric Water Heater
This compact NCPYZO heater uses smart self-modulation and safety features like leakage and dry-burning protection, ideal for quick, reliable hot water where space is tight and safety is a priority.
How to Upgrade Gas Lines for Tankless Water Heaters
Installing a tankless water heater usually means upgrading your gas line to handle a higher BTU load safely and efficiently. You can do this yourself if you’re comfortable with plumbing and gas work, but it demands precision, the right materials, and strict adherence to local codes.
Upgrading the gas line is crucial for safe operation.
Start by calculating the required gas line size based on your heater’s BTU rating. For example, a unit rated at 199,000 BTU per hour typically needs a 1-inch black steel pipe for runs under 50 feet. Longer runs or higher BTUs call for larger diameters to avoid pressure drops that reduce performance or cause safety issues.
BTU Demand
Max Length (ft)
Pipe Size (Black Steel)
100,000
50
3/4 inch
199,000
50
1 inch
300,000
50
1 1/4 inch
Gas Pipe Size by BTU and Length
Black steel pipe is the common choice for gas lines inside homes, favored for durability and longevity. Yellow flex gas line is easier to install and bends around corners but has length limits and is typically restricted to short runs or appliance connectors, never main supply lines. Check local codes before choosing.
You’ll need pipe wrenches, a pipe cutter, thread sealant rated for gas lines, a pipe threader if cutting your own pipe, and a gas pressure gauge for testing. Also, have a supply of black steel pipe or yellow flex line, fittings, and shutoff valves.
1
Turn off the main gas supply
Shut off gas at the meter and open a nearby appliance valve to relieve pressure.
2
Remove the old gas line or prepare the existing piping
Cut the old pipe if upgrading; clean pipe ends and threads.
3
Measure and cut new gas line
Cut pipe to length, deburr edges, and apply pipe thread sealant.
4
Install new gas line with fittings and shutoff valve
Tighten securely, avoiding overtightening that can crack fittings.
5
Conduct a pressure test
Connect a manometer or gas pressure gauge, pressurize the line with air or inert gas to code-specified pressure (commonly 3 psi), and check for leaks with soapy water.
6
Turn gas back on and check appliance operation
Open supply valves slowly, inspect connections, and verify the heater runs properly without gas smell or leaks.
Safety warning
Never test gas lines with an open flame. If you smell gas or detect a leak, shut off the supply immediately and ventilate the area. Gas work mistakes risk explosion or carbon monoxide poisoning.
A homeowner can upgrade the gas line themselves only if local regulations allow it and they have the proper tools, knowledge, and time. Many areas require a licensed plumber’s permit and inspection to ensure safety compliance. When in doubt, hire a professional.
Gas Line Upgrade Checklist
Confirm your heater’s BTU rating
Calculate pipe size and length needed
Choose between black steel and yellow flex line per code
Gather pipe, fittings, tools, and sealant
Turn off and relieve gas pressure before starting
Pressure test new lines before use
Schedule inspection if required by local code
Sizing tip
If your gas line run exceeds 50 feet or your heater’s BTU rating is near the upper limit of a pipe size, step up one pipe size to ensure steady gas flow.
Upgrading gas lines is a key step in installing a gas tankless water heater safely. It ensures your heater receives the gas volume and pressure it needs for reliable on-demand hot water. If you want detailed steps on mounting and venting your tankless heater, see the complete installation guide How to Install a Tankless Water Heater: Step-by-Step Guide.
Venting Requirements for Tankless Water Heaters
Tankless water heaters need specialized venting systems that differ significantly from traditional tank heaters.
Unlike conventional tank units that often rely on natural draft vents, tankless models require forced ventilation because they generate higher combustion temperatures and produce condensate.
Condensing tankless water heaters, which are more efficient, use stainless steel or PVC vent pipes rated for acidic condensate exhaust, unlike the metal vents used for tank heaters.
You must follow the manufacturer’s venting system guidelines exactly to avoid problems like corrosion, leaks, or carbon monoxide buildup.
1
Select vent pipe material
Use the correct pipe: stainless steel or PVC for condensing models; double-wall metal pipe for non-condensing units. Check the manual for approved types.
2
Plan vent routing
Route vent pipes through walls or roofs with proper support and clearances. Use manufacturer-supplied wall thimbles or roof flashings to prevent leaks.
3
Seal all joints
Use high-temperature sealants or gaskets specified for your vent material to make tight, gas-tight seals at every joint and connection.
4
Install vent termination
Place outdoor vent terminations away from windows, doors, and air intakes as required by code and the installation manual.
Outdoor tankless water heaters simplify venting since they don’t require exhaust pipes; fresh air and combustion gases are released directly into the open air.
Outdoor Installation
Installing the heater outdoors avoids complex venting but demands a model rated for weather exposure and freeze protection.
Common Venting Mistakes
Incorrect vent pipe material, poor sealing, improper slope, or vent terminations too close to openings can cause leaks, corrosion, carbon monoxide hazards, and premature equipment failure.
Venting Checklist
Confirm vent pipe material matches heater type (condensing vs non-condensing)
Check clearance and support specifications for vent pipes
Use approved vent terminations and accessories
Seal all vent joints tightly
Follow manufacturer’s venting layout exactly
Locate vent termination according to local codes and manual
Ensure outdoor units have proper weatherproofing
Tankless water heater venting systems are designed to manage higher combustion temperatures and condensate safely, so cutting corners on vent installation risks costly damage and safety issues.
Consult your heater’s installation manual for exact venting requirements and consider local codes; improper venting is a leading cause of installation failures and hazards.
When Permits and Licensed Professionals Are Required
You usually need a permit to install a tankless water heater, whether electric or gas, because it involves changes to your home’s plumbing, gas, or electrical systems. Local building codes often require inspections to confirm the installation meets safety standards.
Electric tankless water heaters under a certain size — often around 36 kW or less — sometimes qualify for a permit exemption or simplified approval, depending on your jurisdiction. Always check with your local building department before starting.
Gas tankless water heater installations almost always require a licensed plumber or gas fitter. These professionals handle the gas line upgrades, proper venting, and pressure relief valve installation. Electrical work for gas models may also need a licensed electrician.
Skipping permits or professional installation can lead to serious consequences. Insurance claims might be denied if a fire or carbon monoxide poisoning occurs due to unpermitted work. Additionally, selling your home later can become complicated if the heater was installed without proper documentation.
1
Contact your local building department
Ask about permits and inspection requirements for tankless water heater installation.
2
Hire licensed professionals as required
Engage a licensed plumber for gas line and venting work, and a licensed electrician for electrical connections if needed.
3
Submit permit applications
Provide detailed plans and product specs for approval before installation.
4
Schedule inspections
Arrange for inspections during and after installation to verify code compliance.
Licensed plumber help for tankless heaters
Licensed plumbers ensure gas lines are correctly sized and installed, reducing the risk of leaks or insufficient gas supply that could damage the heater or create safety hazards.
Consequences of unpermitted installation
Unpermitted work may void warranties and expose you to fines, legal trouble, and safety risks, including carbon monoxide poisoning and fire hazards.
Common Installation Mistakes That Cause Damage or Leaks
Leaks and damage after installing a tankless water heater usually come down to a handful of avoidable mistakes.
One frequent cause is improper gas line sizing or faulty connections. Tankless models demand a higher BTU input, so using undersized or poorly connected gas lines starves the burner, leading to performance issues and potential gas leaks.
Gas Line Mistakes
Never rely on yellow flex gas lines that aren’t rated for higher BTU loads or skip tightening black steel pipe connections to the manufacturer’s torque specs. Both cause leaks or unsafe operation.
Venting errors also top the list. The vent pipe must slope correctly—usually upward towards the termination point—to ensure proper exhaust flow. Using the wrong vent material or ignoring manufacturer venting specs invites condensation buildup, corrosion, and backdrafts.
Skipping the pressure relief valve installation is a critical error. This valve protects your plumbing from excessive pressure, and if omitted or faulty, you risk pipe bursts or heater damage.
Water line mistakes are common too. Poor soldering, loose fittings, or inadequate sealing lead to leaks that can cause water damage and corrosion in the heater’s heat exchanger.
Seal Water Lines Right
Use Teflon tape or pipe dope on threaded connections, and always double-check for tightness without overtightening, which can crack fittings.
Ignoring manufacturer instructions and local code requirements is a recipe for problems. These rules exist to keep your installation safe and efficient, including the right gas pressure, venting clearances, and water connections.
Tankless Water Heater Installation Mistakes Checklist
Validate gas line size for your heater’s BTU rating
Confirm vent pipe slope and use approved materials
Obtain permits if required and adhere to local codes
If your tankless water heater leaks after installation, check these areas first. Most common tankless water heater problems trace back to these mistakes rather than faulty units.
Next Steps After Installing Your Tankless Water Heater
After installation, a detailed check for leaks, proper venting, and electrical connections is essential for safe operation.
1
Inspect for Leaks
Turn on water and gas supply slowly, watch every joint and fitting for drips or odor. Fix leaks immediately.
2
Verify Venting
Ensure vent pipes are secure, sloped correctly, and clear of obstructions. Look for any signs of exhaust fumes indoors.
3
Electrical Check
For electric or electronic ignition gas models, confirm proper wiring to the circuit breaker and correct voltage.
Registering your unit with the manufacturer activates the warranty and gives you access to support and updates.
Regular maintenance is key to longevity. Flushing the system annually removes scale buildup, which can impair efficiency and damage the heat exchanger.
Scale Prevention
If you have hard water, install a water softener or use scale prevention additives to protect your heater.
Consider adding a recirculation system if you want hot water instantly at distant taps. This reduces water waste but adds some complexity and energy use.
Understanding operating costs helps set realistic expectations. Tankless water heaters often save energy by heating on demand, but your gas or electric bill depends on your usage pattern.
Heater
Watts
Per hour
Per day (8 h)
Per month (30 days)
Typical tankless water heater power
4,500 W
77¢
$6.12
$183.60
Standard electric water heater
4,500 W
77¢
$6.12
$183.60
Calculated at 17¢ per kWh. Energy use comparison assuming 8 hours daily use at 17¢ per kWh.
Post-Installation To-Dos
Check every connection for leaks
Confirm venting setup matches instructions
Register your heater for warranty
Schedule annual flush and inspection
Evaluate if recirculation suits your home
Review expected energy costs based on your household’s size and hot water demand
Questions People Ask
Can I install a tankless water heater myself without a permit?
Most areas require a permit for installing a tankless water heater because it involves gas, electrical, or plumbing work that affects safety. Skipping the permit risks fines and insurance issues. Check local building codes and your municipality’s rules before starting to avoid costly legal problems.
How do I know if my gas line needs upgrading for a tankless heater?
If your current gas line was sized for a traditional tank heater, it likely needs upgrading to handle the higher BTU demand of a tankless model. Calculate the total BTU load of your new heater and compare it to your existing line capacity or consult a professional. Signs like low water temperature or pilot light outages may also indicate insufficient gas flow.
What venting materials are approved for tankless water heaters?
Tankless water heaters require venting materials rated for high temperatures and corrosive exhaust, such as stainless steel or special polypropylene pipes. Standard metal or PVC venting used for traditional tanks often isn’t suitable. Follow the manufacturer’s specifications closely to ensure safe and efficient venting.
Are electric tankless water heaters easier to install than gas models?
Electric tankless heaters generally have simpler installation because they don’t need gas lines or complex venting. However, they require a dedicated circuit breaker and wiring sized to handle their high current draw. This electrical work may require a licensed electrician depending on local codes, so the overall ease depends on your skills and permits.
How do I size a tankless water heater for my household’s hot water needs?
Start by adding the flow rates (GPM) of all fixtures that might run simultaneously, like showers, sinks, and appliances. Then pick a unit with a flow capacity slightly above this total to ensure consistent hot water. Also consider the temperature rise needed based on your incoming water temperature to choose the right BTU or kW rating.
I am a mechanical engineer and love doing research on different home and outdoor heating options. When I am not working, I love spending time with my family and friends. I also enjoy blogging about my findings and helping others to find the best heating options for their needs.