

Your Vornado heater clicks on, the fan spins for a second, and then everything goes dead. Or maybe it just sits there humming at you like a stubborn refrigerator, pushing out zero heat. The room stays cold, and your first instinct is to kick the thing or start shopping for a new unit.
Hold that thought. Most Vornado heater failures come down to a handful of predictable causes, and a surprising number of them are fixable in under twenty minutes with basic tools. This guide walks you through the diagnosis in the right order, so you don’t waste time tearing apart the motor when the real problem is a $10 fuse or a clogged air intake.
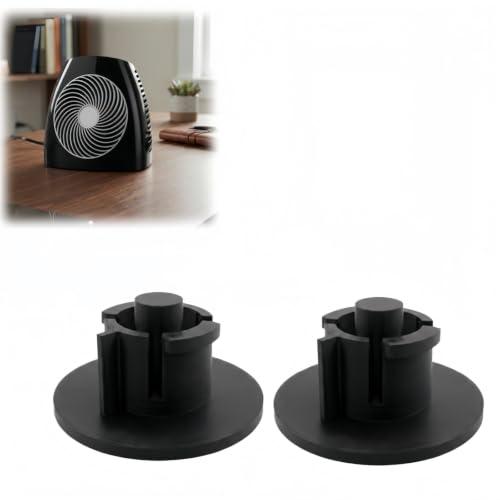
pqkfygf
pqkfygf Tip Over Switch Replacement Compatible with…
- 【Tip over switch replacement】Designed for replacing the tip over switch component on compatible heating equipment, helping restore…
- 【 component repair】A practical replacement part for users who need to service heater components and handle individual part replace…
- 【Compact switch design】The small component size allows convenient storage and installation for DIY repair projects and household a…
You’ll learn what to check first, how to safely test the thermal cutoff, when a humming noise means a stuck fan blade, and how to tell the difference between a cheap repair and a dead motor. There’s also a maintenance routine that stops most of these problems from coming back. No guesswork, just a logical sequence of tests.
If you’ve already confirmed the issue is the tip-over safety switch, a replacement part like the pqkfygf Tip Over Switch Replacement can restore that function without replacing the whole heater. It’s a third-party component designed to fit compatible Vornado MVH models, and it’s useful when the internal switch fails but everything else checks out.
Before You Start: Safety First and Tools You’ll Need
Space heaters are one of the leading causes of house fires in winter. That’s not a scare tactic, it’s a statistic. So before you put a screwdriver anywhere near the housing, unplug the heater from the wall. Not just switch it off. Pull the plug.
Wait at least ten minutes after unplugging before you open anything. The internal capacitors and the heating element can hold a charge that bites. Ten minutes is enough for most of that energy to dissipate.
Here’s what you’ll need for most repairs:
- Phillips-head screwdriver (usually #2, sometimes #1 for smaller screws)
- Flathead screwdriver for prying clips
- Multimeter with continuity setting (you can get one for under $20)
- Compressed air canister or a soft brush
- Replacement thermal fuse or tip-over switch if those parts test bad
Time estimates: Quick checks take five minutes. Replacing a thermal fuse takes about fifteen. Cleaning the fan and motor takes twenty to thirty. A full motor replacement is not worth doing unless you enjoy frustration.
One more thing: do this on a sturdy table, not your lap. You’ll need both hands free, and the heater is awkward to hold while you work.
Quick Checks – Power Supply, Outlet, and Reset Button
Start with the boring stuff. The heater might be fine and the problem is elsewhere.
Plug the heater into a different outlet. One that you know works, like the one your phone charger uses. If it runs there, the original outlet was dead or the breaker tripped. Check the circuit breaker panel and reset any tripped breakers. A space heater draws 12.5 amps at 1500 watts, so if other things share that circuit, you’re asking for trouble.
Look at the power cord along its full length. Any frayed spots, melted sections, or exposed wire means you stop right there. That cord needs replacing, and that’s a job for a pro or a new heater. Don’t patch it with electrical tape.
Now find the reset button. On most Vornado models, it’s on the back or side of the unit, near the power cord. It’s a small button that pops out when the heater trips its internal safety. Press it firmly until it clicks. If it stays in, try running the heater again. If it pops back out within a few seconds, you’ve got a real problem, not a reset issue.
Check the thermostat dial, too. If it’s set too low, the heater won’t kick on even though it has power. Turn it all the way up for testing purposes. Same with the mode switch. Make sure it’s on High or Low heat, not Fan Only.
The Most Common Culprit: Overheating and the Thermal Cutoff
Vornado heaters have two separate safety devices, and people mix them up all the time. The reset button is one thing. The thermal cutoff fuse is another. They do different jobs.
The thermal cutoff is a one-time-use fuse. It’s designed to blow permanently if the heater gets too hot. That’s not a bug, it’s a feature. When it blows, the heater loses power completely, even if everything else works. You can’t reset it. You have to replace it.
Why does it blow? Usually because the air intake is blocked or the fan motor is dying. The heater pulls air in from the back, pushes it past the heating element, and out the front. If that airflow gets restricted, the internal temperature climbs past the fuse’s rating, and it sacrifices itself to prevent a fire.
Here’s what most people get wrong: they replace the fuse, plug the heater back in, and it blows again within minutes. That’s because they didn’t fix the underlying airflow problem. The fuse is a symptom, not the disease.
How to Locate and Reset the Thermal Cutoff
First, confirm whether your model has a resettable thermal cutoff or a one-time fuse. Some Vornado models have a small button that you can push with a paperclip. Others have a fuse that looks like a small white or black cylinder with two wires coming out of it.
To find it, you’ll need to open the housing. Remove the screws on the back panel. Some models have screws under rubber feet, so peel those off first. Keep track of which screw goes where, as they’re often different lengths.
Once the back panel is off, look near the heating element. The thermal cutoff is usually mounted on the heater core or near the fan housing. It’ll have two wires connected to it, and it’s often wrapped in a heat-resistant sleeve.
If yours is the resettable type, press the small button with a paperclip. If it clicks, you’re back in business. If it doesn’t, or if you have the one-time fuse type, you need to test it.
Replacing a Blown Thermal Fuse (Step-by-Step)
Testing the fuse requires a multimeter. Set it to the continuity setting. Touch one probe to each end of the fuse. If the meter beeps or shows a reading near zero, the fuse is fine. If you get no reading, the fuse is blown.
Replacement is straightforward on most models. Here’s the sequence:
- Unplug the heater and let it cool completely.
- Open the back panel as described above.
- Note the position of the old fuse and how the wires are attached. Take a photo with your phone if that helps.
- Cut the wires or release the connectors. Some models use spade connectors, others are soldered. If soldered, you’ll need a soldering iron.
- Install the new fuse. Use the same rating as the old one. It’s usually printed on the fuse body, something like 240°F or 192°F. Don’t guess. A fuse with a lower rating will blow constantly. A higher rating defeats the safety purpose.
- Reconnect the wires, secure the fuse in its clip or bracket, and reassemble the housing.
- Plug the heater in and test it on low heat first.
The replacement fuse costs a few dollars. It’s worth buying the correct rating, not just whatever’s cheapest. Check the Vornado FAQ for model-specific guidance if you’re unsure about the location or rating.
Before you put everything back together, clean the fan and the intake area. If you skip this step, you’re just setting yourself up for a repeat failure.
Fixing a Humming Heater with a Stuck Fan Blade
A heater that hums but produces no heat has a different problem. The motor is getting power, but the fan blade isn’t turning. You’ll hear a distinct electrical hum, and the unit might vibrate slightly, but no air moves.
This is almost always a mechanical jam. The fan blade is either physically blocked or the motor shaft is seized. Here’s how to tell which one you’re dealing with.
Unplug the heater and open the housing. Look at the fan blade. Try to spin it by hand. If it moves freely, the problem is electrical. If it’s stuck, you’ve found your culprit.
A common cause of a stuck blade is a piece of debris wedged between the blade and the housing. A paperclip, a piece of packaging, even a thick layer of dust can act like a brake. Remove the obstruction and see if the blade spins freely.
If the blade still won’t turn, the motor bearing is seized. This happens when dust mixes with the motor’s lubricant over time and turns into a paste that locks the shaft. You can try to free it with a few drops of lightweight oil applied to the bearing, but this is a temporary fix at best. The motor is on its way out.
Another thing to check: the fan blade itself might be warped. If it wobbles when you spin it, it might be rubbing against the housing. A warped blade needs replacing, not bending. You can’t reliably straighten a plastic blade.
Cleaning the Motor and Air Intake for Better Airflow
Here’s the dirty secret of space heater failures: most of them are caused by dust. The fan pulls air through the unit, and that air carries dust, pet hair, and lint. Over a season or two, that stuff accumulates on the fan blade, the motor, and the heating element.
That buildup does two bad things. It restricts airflow, which makes the heater run hotter than it should. And it insulates the motor, which makes it run hotter too. Both of those conditions stress the thermal cutoff and shorten the motor’s life.
Cleaning is simple. Once the housing is open, use a can of compressed air to blow out the dust from the motor and the fan blade. Work from the inside out. Hold the fan blade still with one hand so it doesn’t spin while you’re blowing air at it. Spinning a motor with compressed air can generate a voltage spike that damages the electronics.
For stubborn buildup, use a soft brush to loosen the dust, then blow it out. Don’t use water or any liquid cleaner. You’ll never get it fully dry, and moisture on the electrical components is a shock hazard.
Pay special attention to the air intake grille on the back of the unit. This is the first place dust collects. A vacuum with a brush attachment works well for this. If you can see light through the grille after cleaning, you’ve done a good job.
How often should you do this? If you run the heater daily, clean it once a month. If you use it occasionally, once at the start of the season and once mid-season is enough. The difference in performance is noticeable. A clean heater moves more air and heats the room faster.
When to Call It Quits – Motor Failure vs. Repair
Not every problem is fixable with a fuse and a can of compressed air. Sometimes the motor is genuinely dead, and the cost of replacing it exceeds the value of the heater.
Here’s how to tell the difference. If the heater has no power at all and you’ve confirmed the outlet works, the cord is intact, and the thermal fuse tests fine, the problem is likely the motor or the control board. Both are expensive parts.
A motor replacement on a Vornado heater typically costs $40 to $70 for the part alone, if you can find it. A new heater costs $60 to $100. The math doesn’t work. Unless you’re attached to the specific unit, it’s not worth the effort.
Another sign that it’s time to quit: the heater trips its reset button repeatedly after you’ve cleaned it and replaced the fuse. That’s the safety system telling you the internal temperature is still too high. The heating element might be partially shorted, or the motor is dragging and generating excess heat. Both are beyond a simple DIY fix.
Also consider the age of the unit. Vornado heaters have a typical lifespan of five to eight years with regular use. If yours is older than that and it’s failing, you’re better off putting the money toward a new one.
For reference, similar troubleshooting logic applies to other heater brands. If you have a Honeywell unit that’s acting up, the Honeywell heater fix guide covers a lot of the same territory. The core principles of airflow, thermal cutoff, and motor failure are universal.
Preventing Future Breakdowns (Maintenance Schedule)
Most Vornado heater failures are preventable. The routine is simple, and it takes less than an hour per month.
Start with the monthly cleaning we just covered. That’s the single most effective thing you can do. A clean heater doesn’t overheat, and an overheating heater is what blows fuses and kills motors.
Check the power cord every month. Look for cracks, discoloration, or any place where the cord feels hot to the touch during operation. A warm cord is a warning sign of high resistance, which means a potential fire hazard.
Keep the area around the heater clear. The manual says three feet, and that’s not a suggestion. Curtains, blankets, and furniture can block airflow or get pulled into the intake.
At the start of each season, do a deeper inspection. Open the housing, clean the fan and motor, check the thermal fuse and tip-over switch for proper operation. This is also a good time to test the tip-over switch by tilting the heater while it’s running. It should shut off immediately.
If the tip-over switch is the component that’s failing, the heater control valve guide has useful diagnostic steps for verifying that specific part. A faulty tip-over switch is a safety hazard, so it’s worth confirming it works before you rely on the heater for the winter.
Don’t use an extension cord. This is a rule, not a recommendation. A 1500-watt heater on a thin extension cord is a fire waiting to happen. If you absolutely must, use a heavy-duty cord rated for at least 15 amps, and keep it as short as possible. But really, just don’t.
Vornado Warranty and When to Contact Support
Before you crack open the housing, check whether your heater is still under warranty. Vornado typically offers a five-year warranty on their heaters. If your unit is less than five years old and it fails, you might get a free repair or replacement.
You can check the warranty status by contacting Vornado support with your model number and purchase date. The model number is on a sticker on the bottom or back of the unit. Don’t skip this step. A free replacement beats any DIY repair.
If the unit is out of warranty, you have two options. You can attempt the repairs in this guide, or you can contact Vornado for an out-of-warranty repair quote. In many cases, they offer a flat-rate repair service that might be cheaper than you think.
But here’s the thing: Vornado’s support team is genuinely helpful. They can walk you through specific troubleshooting for your model and tell you exactly which parts you need. The Vornado FAQ page covers common issues and points you to the right resources. It’s worth a five-minute call before you buy any replacement parts.
One more scenario: if you’ve replaced the thermal fuse, cleaned the unit, and it still blows the fuse immediately, that’s a sign of a deeper electrical problem. Stop there. Don’t keep replacing fuses and hoping for a different result. Contact a professional or replace the heater.
Common Misconceptions About Vornado Heater Repairs
There’s a lot of bad advice floating around about fixing heaters. Let’s clear up a few things that people get wrong.
Myth: A bigger fuse is better because it won’t blow as often. Wrong. The fuse rating is determined by the heater’s design. A higher-rated fuse won’t blow when it should, which defeats the safety mechanism. That’s how fires start. Always replace with the exact same rating.
Myth: You can repair a blown thermal fuse by resetting it. Some fuses are resettable, but most one-time fuses are not. If yours doesn’t have a visible reset button, it’s a one-time fuse. Trying to force it back into service is dangerous.
Myth: The reset button on the heater is the same as the circuit breaker. They’re different. The heater’s reset button trips on internal overheating. The circuit breaker trips on electrical overload. If the breaker trips, you have a wiring problem or too many devices on the same circuit.
Myth: You need to replace the whole motor if it hums. Not always. A humming motor might just have a stuck blade or a seized bearing. Both are sometimes fixable with cleaning and lubrication. But if the motor itself is burnt out, you’ll smell it. A distinct burnt odor means the motor windings are cooked.
Myth: More watts means better heating. No. A 1500-watt heater produces the same amount of heat regardless of the brand. The difference between heaters is how efficiently they distribute that heat. Vornado’s advantage is their air circulation, not their wattage. If your heater is blowing fuses, it’s not because it’s underpowered.
Comparison of Repair Approaches
Here’s a quick reference table to help you decide which path to take based on your symptoms.
| Symptom | Likely Cause | DIY Fix | Time | Cost |
|---|---|---|---|---|
| No power, no sound | Dead outlet, tripped breaker, or blown thermal fuse | Test outlet, reset breaker, replace fuse | 10-20 min | $5-$15 |
| Power, but no heat | Thermostat set too low, or heating element failure | Adjust thermostat, test element with multimeter | 10 min | $0-$20 |
| Humming, no fan movement | Stuck fan blade, seized motor bearing | Clean blade, lubricate bearing | 20-30 min | $0-$10 |
| Runs briefly, then shuts off | Overheating from clogged intake | Clean air intake and fan | 20 min | $0 |
| Reset button keeps tripping | Restricted airflow or failing motor | Clean unit; if persists, motor replacement or new unit | 30 min + | $40+ or new unit |
| Tip-over switch not working | Failed internal switch | Replace tip-over switch | 15 min | $10-$20 |
Use this table as a starting point. The symptom you see might have multiple causes, so work through the list in order.
Frequently Asked Questions
Why does my Vornado heater keep shutting off after a few minutes?
That’s the thermal cutoff doing its job. The heater is getting too hot, usually because the air intake or fan is clogged with dust. Unplug the heater, clean the intake grille and fan blade with compressed air, and try again. If it still shuts off, the thermal fuse may be weak and need replacing.
Can I use a Vornado heater with an extension cord?
You shouldn’t. A 1500-watt heater draws a lot of current, and most extension cords aren’t rated for it. The cord can overheat and start a fire. Plug the heater directly into a wall outlet. If you must use an extension cord, use one rated for at least 15 amps and keep it as short as possible.
How do I know if the thermal fuse is blown?
Use a multimeter set to continuity. Touch one probe to each end of the fuse. If you get a reading near zero, the fuse is intact. If the meter shows no continuity, the fuse is blown and needs replacing. This is the only reliable way to test it.
Is it safe to open the heater and clean the inside myself?
Yes, as long as you unplug it first and wait a few minutes for the capacitors to discharge. Work on a flat surface, keep track of the screws, and don’t touch the heating element until it’s fully cool. If you’re uncomfortable with basic disassembly, stick to cleaning the outside and the intake grille with a vacuum.
What should I do if the heater smells like burning when it runs?
A burning smell on first use of the season is common as dust burns off the heating element. If it goes away after a few minutes, you’re fine. If the smell persists or gets stronger, unplug the heater immediately. It could be a failing motor or a shorted wire, both of which are fire hazards.
Final Thoughts and Practical Tips
You’ve got the knowledge now. Here’s the short version to act on:
- Always unplug the heater before any inspection or repair.
- Test the outlet and reset button before opening the housing.
- Clean the fan and air intake monthly to prevent most failures.
- Replace a blown thermal fuse with the exact same rating.
- If the reset button keeps tripping after cleaning, the motor is likely failing.
- Check your warranty before buying parts. Vornado’s support team is helpful.
- When in doubt, replace the unit. A $60 new heater beats a $200 fire repair.
Most Vornado heater problems are dust, not disaster. The fix is often a can of compressed air and a few minutes of your time. Start with the simplest explanation, work through the checks in order, and you’ll have the room warm again before you know it.
For related troubleshooting on other brands, the Dyson heater airflow fix covers similar principles of airflow restriction and thermal protection. The underlying physics is the same across all space heaters.

I am a mechanical engineer and love doing research on different home and outdoor heating options. When I am not working, I love spending time with my family and friends. I also enjoy blogging about my findings and helping others to find the best heating options for their needs.
Related guides

Best Compact Electric Heaters for 200 sq ft Rooms
What truly warms a 200 sq ft room? Find your best electric heater with our clear, practical buying…
Best Plug-In Electric Heaters For 2026 | Reviews & Buying Tips
Find the best plug-in electric heater for your room. Our guide compares top models for efficiency, safety, and…
Do Electric Space Heaters Emit Toxic Fumes? Safety Guide
Electric space heaters do not give off toxic fumes, as they operate using electricity without combustion, making them…