

You pull into your driveway after a long winter drive, flip the switch on your hydronic heater, and nothing happens. Cold air. Maybe a faint clicking sound. Your rig has that Webasto burner that’s supposed to keep you warm, but it’s dead because you skipped last year’s service. I’ve seen this scenario play out in RV parks and truck stops more times than I can count. The fix is usually simple — a clogged nozzle or a dirty fuel filter — but the downtime is a real pain.
This article walks you through the essential products for hydronic heater maintenance, what each one does, and why skipping them costs you more in the long run. By the time you’re done, you’ll know exactly which parts to buy, how often to swap them, and whether you can do the work yourself or should call a pro. No fluff, just the hard-won lessons from years of keeping these systems running.
ELJ Parts
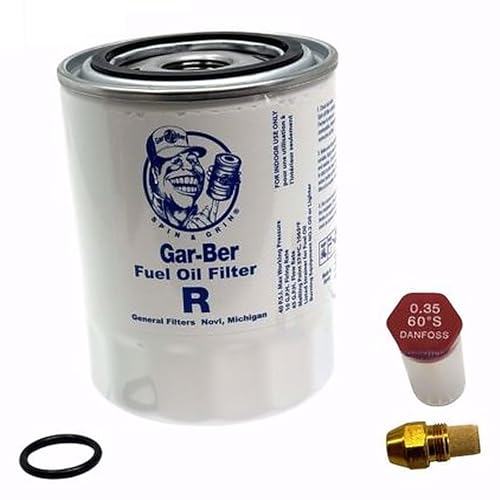
ELJ Parts 3560S2605 Elite Annual Service Kit…
- COMPLETE SERVICE KIT: Annual maintenance kit includes Gar-Ber fuel oil filter, nozzle, brass fitting, and O-ring seal for comprehe…
- COMPATIBLE SYSTEMS: Designed specifically for Aqua Hot and Hydro Hot Webasto heating systems to ensure optimal performance and rel…
- HIGH-QUALITY FILTRATION: Features a Gar Ber fuel oil filter with 0.35 micron rating (60°S) to effectively remove contaminants and…
If your heater runs on diesel or kerosene, uses a Webasto-style burner, and lives in an RV, boat, or overland vehicle, this is for you.
One kit that takes the guesswork out of annual service is the ELJ Parts 3560S2605 Elite Annual Service Kit. It bundles a Gar-Ber fuel oil filter (0.35 micron), a new nozzle, a brass fitting, and an O-ring seal — all the parts that wear out first. Instead of hunting down each piece from different suppliers, you get a matched set designed for Aqua Hot and Hydro Hot Webasto systems. It makes the job straightforward.
Why Annual Maintenance Is Non-Negotiable

Hydronic heaters burn fuel to heat a coolant loop. That process creates soot, varnish, and microscopic wear particles. Over a single heating season, a typical nozzle can drift out of its spray pattern by 10-15%. The flame gets lazy, fuel efficiency drops, and carbon builds up on the combustion chamber walls.
I pulled apart a unit that hadn’t been serviced in three years. The nozzle was gunked solid, the fuel filter looked like mud, and the O-ring had gone hard as a rock. Repair cost: over $400 in labor and parts. Compare that to a $60-80 annual kit and two hours of your time.
Manufacturers like Webasto and Aqua Hot recommend service every 12 months or 1,000 operating hours, whichever comes first. If you run your heater heavily — say, full-time RV living — hit that hour mark before the calendar.
Key Parts That Need Regular Replacement
Not every component wears out at the same rate. Here are the four that demand annual attention, with specific details on why they fail.
Fuel Filter (0.35 Micron or Equivalent)
The filter catches sediment, bacteria growth (yes, diesel bugs), and wax crystals that form in cold weather. A 0.35 micron rating is standard for Webasto-based systems. That’s fine enough to trap particles that would clog a nozzle orifice, but not so tight it restricts flow. Cheap automotive fuel filters let particles through. Stick with the spec.
The Gar-Ber filter included in the ELJ kit is a known workhorse. It has a wide sealing surface that rarely leaks, unlike some generic filters that crush when torqued too hard.
Nozzle
The nozzle is the heart of the combustion process. It meters fuel and atomizes it into a fine mist. Even a tiny burr on the tip or a bit of varnish inside changes the spray angle. That leads to incomplete burn, smoke, and soot. A fresh nozzle gives you a clean blue flame instead of a lazy orange one.
Always replace the nozzle, don’t clean it. The orifice is precision-machined and cleaning rarely restores it fully.
O-Ring Seal
That little rubber ring between the burner head and the mounting flange prevents combustion gases from leaking into the living space. Over time, heat cycles turn it brittle. A cracked O-ring can let carbon monoxide sneak out. It’s a $2 part that can save your life. Replace it every year.
Brass Fitting
Some kits include a new brass compression fitting for the fuel line. The old one can get crushed or develop a hairline fracture from repeated disassembly. If it leaks, you get air in the fuel line — which means hard starts and sputtering flames.
DIY Service vs. Hiring a Pro: What’s Worth It?
Lots of owners are handy enough to swap a filter and nozzle. The job takes about 30 minutes if you’ve done it once. But there are traps: over-tightening the filter can crack the housing, cross-threading the nozzle, or forgetting to purge air from the fuel line.
Here’s a comparison that covers the trade-offs.
| Approach | Tools Required | Time | Parts Cost (Typical) | Risk |
|---|---|---|---|---|
| DIY with a complete kit (e.g., ELJ Elite Kit) | Socket set, wrenches, small pick, rags | 30-60 minutes | Moderate (kit price) | Low if you follow instructions |
| DIY sourcing individual parts | Same tools + knowing exact specs | 60-90 minutes (incl. hunting parts) | Can be higher due to shipping | Medium – mismatched parts possible |
| Professional service | Specialized combustion analyzer, shop labor | 1-2 hours | High (labor + parts markup) | Low, but schedule dependent |
For most owners, the sweet spot is DIY with a complete kit. You save the labor markup and don’t have to guess which parts fit. If you’re not comfortable working with fuel lines or your heater has a complex control board, hand it to a pro.
Essential Tools and Tips for a Smooth Service
Beyond the kit, you’ll want a few basic tools. A 10mm socket for the burner cover, a 17mm wrench for the filter housing, and a small flathead screwdriver to pop the O-ring out. Use a vacuum pump or a fuel primer bulb to purge air after reassembly – running the heater dry damages the fuel pump.
One thing that always trips people up: the order of disassembly. Remove the electrical connector first, then the fuel line, then the burner. Mark the wires with tape if your memory is fuzzy. Take a photo before you start.
Also, check the maintenance needs for a gas heater if you’re running propane or natural gas – the principles are similar but the parts differ.
Frequently Asked Questions
How often should I change the nozzle in my hydronic heater?
Every year or every 1,000 operating hours. Nozzles degrade from heat cycling and fuel contaminants. Waiting two years often leads to a hard start or visible smoke. I’ve seen a 2-year-old nozzle that looked clean but had a 20% flow reduction on a test bench. Swap it annually.
Can I use a generic automotive fuel filter instead of a 0.35 micron one?
Not really. Automotive filters are typically 10-30 microns. They let through particles that clog the nozzle within weeks. The 0.35 micron rating is specific to these low-flow burner systems. Stick with the Gar-Ber filter or an OEM equivalent.
What happens if I don’t replace the O-ring?
The O-ring hardens and cracks. Combustion gases can leak into the vehicle interior. At best, you smell diesel fumes. At worst, carbon monoxide builds up. Replace it every service – it’s cheap insurance.
Do I need to bleed the fuel line after swapping the filter?
Absolutely. Air in the line makes the heater sputter or fail to ignite. Most Webasto-style burners have a bleed screw on the fuel pump. Crack it open, cycle the pump manually until fuel flows without bubbles, then tighten. Skip this step and you’ll be troubleshooting a no-start for hours.
How do I know if my heater needs service before the annual interval?
Three signs: the flame looks orange or smokes, the heater takes longer to reach temperature, or you notice soot around the exhaust outlet. Any of these means the nozzle or filter is degrading. Don’t wait – service it right away.
What to Do Right Now
If you own an RV, boat, or truck with a hydronic heater, here’s your short list.
- Order a complete service kit with a 0.35 micron fuel filter, nozzle, O-ring, and brass fitting. The ELJ Parts Elite kit covers all of these.
- Set a calendar reminder for every 12 months or 1,000 hours – whichever hits first.
- Gather basic hand tools before you start: sockets, wrenches, small picks.
- Watch a model-specific video for your heater brand (Aqua Hot vs. Hydro Hot have slightly different burner removal steps).
- Keep a spare nozzle and O-ring in your glove box for emergencies.
- Know the common maintenance costs for your system so you’re not overcharged at a shop.
- If you’re installing a new heater or modifying the setup, review how to install a heater for easy maintenance to make future services simpler.

HeaterGuides covers home heating, water heating and HVAC: how the equipment works, what it costs to run, and how to use it safely.
