Maintaining a wood-burning stove involves cleaning ash, inspecting parts, and troubleshooting airflow. It typically takes a few hours and is mostly a DIY job, with professionals needed for chimney sweeping and complex repairs.
Keeping your wood-burning stove in good shape means regular cleaning and inspection to ensure safety and efficiency. This guide breaks down the key maintenance tasks you can do yourself and highlights when to call a pro.
Proper upkeep can extend your stove’s life up to 20 years and keep your home warm with less hassle.
The essentials
Remove ash regularly but leave a thin bed to insulate the firebox.
Check door gaskets using a dollar bill test and replace if air leaks.
Inspect firebricks and baffles annually for cracks or warping.
Sweep the chimney professionally at least once a year before winter.
Use dry, seasoned wood with under 20% moisture to reduce creosote buildup.
Maintaining a Wood-Burning Stove: Complete Step-by-Step
Maintaining a wood-burning stove means regular ash removal, inspecting and replacing door gaskets, cleaning and checking firebricks and baffles, and keeping the stove glass and air intake clear; professionals should sweep the chimney annually. How you maintain a wood-burning stove affects its efficiency, safety, and lifespan, so a thorough approach pays off.
Regular maintenance keeps your wood-burning stove in top condition.
1
Remove Ash Regularly
Keep an ash bed about one-eighth to one-quarter inch thick on the firebox floor; this insulates the stove and helps burning. Remove excess ash after every few fires but never scoop it all out.
2
Inspect and Replace Door Gaskets
Check the gasket for hardening or gaps by closing the door on a dollar bill. If you can pull the bill out easily, the gasket needs adjustment or replacement to prevent unwanted air leaks.
3
Clean and Inspect Firebricks and Baffles
Look for cracks, chips, or warping in firebricks and baffles annually. Replace damaged parts to protect the stove’s metal body and maintain proper airflow inside the firebox.
4
Clean Stove Glass Safely
Use a damp cloth dipped in fine wood ash or a stove-specific cleaner without chemicals to wipe soot from the glass. Avoid abrasive cleaners that can scratch or damage it.
5
Check Air Intake and Vents
Make sure air intake vents and outside air supplies are clear and unrestricted. Blocked airflow reduces combustion efficiency and increases creosote buildup in the chimney.
6
Schedule Professional Chimney Sweeping
Hire a certified chimney sweep at least once a year, ideally before winter, to remove creosote and other blockages. This prevents chimney fires and ensures proper venting.
Maintenance Tools and Safety Checks
Metal ash container with lid
Replacement door gasket and adhesive
Soft cloth and wood ash for glass cleaning
Gloves and dust mask
Carbon monoxide detector tested and working
Fire extinguisher accessible
Ash Removal Caution
Check door gaskets by closing the door on a dollar bill. If you can pull the bill out easily, the gasket needs adjustment or replacement to maintain an airtight seal and prevent unwanted air from rushing in.
Door Latch Adjustment
If the door doesn’t seal tightly, adjust the latch to create an airtight seal. A good seal controls airflow and prevents smoke leaks.
In short
Maintaining a wood stove means keeping ash at a thin layer, sealing the door gasket, inspecting firebricks, cleaning glass carefully, and ensuring air flows freely. Call a pro yearly to sweep the chimney and avoid fire risks.
Tools and Parts for Wood Stove Maintenance
Essentials for cleaning, inspection, and minor repairs
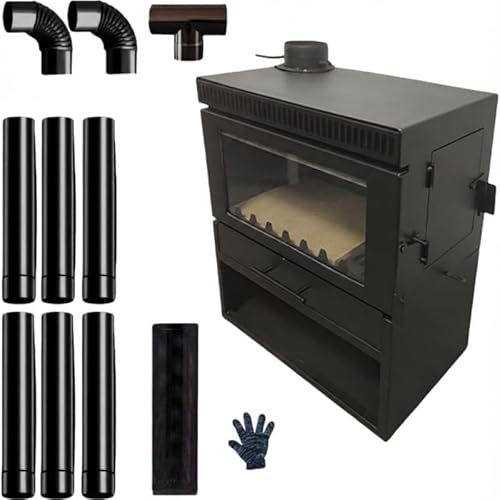
Dual Loading Doors
Acdesino Cast Iron Wood Burning Stove
This stove’s dual-access doors make it easier to clean out ash and inspect the firebox without hassle. Its airwash system also helps keep the viewing glass clear, cutting down on cleaning time.
Its compact size fits tight spaces, making it easier to handle during cleaning and inspection. The integrated cooking surface adds utility without extra equipment.
Servicing the Catalytic Combustor and Troubleshooting Airflow
The catalytic combustor lowers emissions and improves efficiency but needs careful cleaning to avoid damage. Remove ash and soot gently with a soft brush or vacuum, avoiding harsh chemicals or scraping that can harm the catalyst coating.
Proper cleaning of the catalytic combustor is essential for efficiency.
1
Inspect the Catalytic Combustor
Look for cracks, heavy buildup, or warping on the combustor plate. Damage or clogging reduces its ability to burn smoke and increases emissions.
2
Clean the Catalytic Combustor
Remove the combustor carefully following the manufacturer’s instructions. Gently brush off ash and soot with a soft brush; never use water or harsh chemicals as they damage the catalyst.
3
Check for Blocked Air Intake
Make sure the primary and secondary air vents aren’t obstructed by ash, creosote, or debris. Blocked air intake leads to poor draft and smoky fires.
4
Assess Draft and Airflow
Poor draft can cause smoke to spill into the room. Check that the chimney is clear, the damper is open, and that outside air vents are unobstructed. If draft is weak, wood burns inefficiently and creosote builds up faster.
Blocked Air Intake Danger
Restricted air supply causes incomplete combustion, producing dangerous carbon monoxide and heavy creosote deposits. Always maintain clear air passages and use a working CO detector.
Common Mistakes That Cause Damage or Leaks
Burning wood with high moisture content damages your wood stove fastest and leads to leaks. Wet or green wood creates more smoke that leaves creosote deposits in the chimney, blocking the flue and choking off draft. This wastes fuel and increases the chance of a chimney fire.
Avoid Wet Wood
Use only dry, seasoned hardwood with under 20% moisture. A moisture meter helps confirm this before burning.
Ignoring wear on door gaskets or failing to adjust the door latch properly lets air leak into the firebox. This causes wood to burn too fast, wastes fuel, and can warp stove parts. The gasket should form a tight seal that you can test with a dollar bill: if it slips out easily, replace or adjust the gasket and latch.
Gasket Seal Check
A proper seal keeps heat in and smoke out. A loose door lets cold air rush in and soot escape, leading to leaks around the door.
Over-cleaning ash by removing every last bit strips away a thin ash layer that insulates the firebox bottom. That ash bed helps retain heat and promote efficient burning, so leave about one-eighth to one-quarter inch in place.
Neglecting to inspect the chimney for cracks or creosote buildup invites leaks and fire hazards. Cracks can allow smoke into your home or expose materials to dangerous heat. Creosote, a sticky, flammable residue, must be cleaned at least once a year by a professional chimney sweep.
When To Get a Permit or Hire a Licensed Professional
Knowing when to call a professional or get a permit protects your safety and ensures your stove meets code. Not all maintenance is DIY.
Chimney Sweeping
Professional chimney sweeping is essential at least once a year. They remove creosote buildup safely and inspect for hidden damage you might miss.
Any work involving the gas connection or the venting system requires a licensed professional. These systems must meet strict safety standards to prevent carbon monoxide risks.
Installing a new wood stove or modifying the venting or chimney almost always requires a permit from your local building department. Check local codes before starting.
When to Call a Professional
Annual chimney sweeping and inspection
Gas or venting system repairs or modifications
Installing or relocating a wood stove
Repairing chimney cracks or structural damage
More Questions, Answered
How often should the chimney be professionally swept?
A professional chimney sweep is recommended at least once a year, ideally before the heating season starts. If you burn a lot of wood or notice heavy creosote buildup, more frequent cleanings may be necessary to prevent chimney fires and maintain draft.
What are the signs that firebricks need replacement?
Look for cracks, crumbling edges, or warping in the firebricks. Damaged bricks expose the stove’s metal body to intense heat, risking warping or holes. Replace firebricks if cracks are wider than a quarter inch or if pieces break off easily.
How do I properly test and replace door gaskets?
Use the dollar bill test by closing the door on a folded bill; if it slips out easily, the gasket isn’t sealing tightly. To replace, remove the old gasket, clean the groove, and install a new gasket sized for your stove model. Make sure the new gasket is pressed firmly for an airtight seal.
What is the safest way to clean stove glass?
Avoid harsh chemicals. Use a damp cloth dipped in fine wood ash to gently rub the glass, which acts as a mild abrasive to remove soot. Alternatively, use a stove-specific cleaner designed for glass—never abrasive pads or household glass cleaners, which can scratch or damage the surface.
How does wood moisture content affect stove performance?
Wood with more than 20% moisture burns inefficiently, producing excess smoke, creosote, and less heat. Dry, seasoned hardwood with moisture below 20% ensures cleaner combustion, reduces chimney buildup, and improves heat output. Use a moisture meter to check wood before burning.
How do I adjust the door latch for a proper seal?
If the door gasket passes the dollar bill test but the seal still leaks, adjust the door latch by tightening or loosening the latch screw or cam mechanism. The goal is firm pressure without warping the door frame. Test after adjustment to confirm an airtight seal without difficulty closing the door.