

Say your room is 12 by 14 feet and you want backup heat before the first cold snap. The heater size, vent path, and gas line route all have to fit that room before one hole goes in the wall.
The safe order is simple: check the manual and permit rules first, gather the right parts, then mount, pipe, vent, and test in that order. Skip any step and you risk leaks, poor draft, or a heater that never lights right.
How To Install A Gas Wall Heater
Installing a gas wall heater involves mounting the unit securely, connecting gas piping according to the manual, installing venting if required, leak-testing every joint, and then lighting and testing the heater. Most installations are not casual DIY jobs once gas piping or venting is involved; a licensed professional is usually needed for those steps.

Say you want to install a direct-vent gas wall heater in a 10-by-12-foot bedroom. The heater needs at least 6 inches clearance from combustible walls and must be mounted on a stud to hold its weight. The vent penetrates the wall directly outside, sloped correctly to prevent water entry.
Plug-in electric controls on gas wall heaters do not replace proper gas piping or venting. They often control the blower or thermostat but cannot fix gas or vent installation errors.


Check Permits, Clearances, And The Wall First
Installing a gas wall heater usually isn’t a solo weekend project; a licensed pro often handles the gas line connection, vent penetration, and any electrical work. These steps commonly require permits and inspections from your local building department or gas utility.
You can install the heater yourself if you’re only mounting the unit and connecting pre-run gas and vent lines, but as soon as you open walls, cut vent holes, or alter gas piping, permits are almost always mandatory. Check local rules early to avoid costly delays or rework.
The heater’s installation manual spells out the minimum clearances to combustibles such as drywall, wood studs, and insulation. Don’t guess based on internet forums or generic advice; the manufacturer’s specs and local code control these distances and must be followed precisely.
Installing a gas wall heater near electrical outlets is fine if you follow the manual’s vent routing and clearance instructions. However, don’t plug the heater into a receptacle that’s cramped or share its outlet with power strips or cords draped over the unit or vent. This risks damage and creates a fire hazard.
Pick a wall that offers the required clearances, easy access for gas piping, and a safe, short exterior route for venting if your heater needs a direct vent. If the heater is a flued wall-mounted model, ensure the vent exits through an exterior wall with the proper clearance from windows and openings.
Framing around the heater’s rough opening must match the manufacturer’s instructions precisely. Exterior wall framing matters mainly for providing structural support per those specs, not as a universal dimension you can guess. Don’t rely on standard stud spacing alone.
Propane wall heaters generally belong on exterior walls to allow proper venting and gas connection. Avoid interior walls unless the heater is specifically designed for vent-free operation and local codes permit it.
A flued wall-mounted gas heater installs by securing the firebox into the framed rough opening on the exterior wall, then connecting the vent pipe through the wall to the outside. Follow the manual’s guidance on framing, vent length, and clearances exactly.
In short, the key points are to secure permits for any gas, vent, or electrical work, follow manufacturer clearances exactly, choose a suitable wall with safe vent access, and check unknown wall contents before cutting. This sets a solid foundation for a safe, code-compliant install.
Use The Right Heater, Vent, And Gas Line
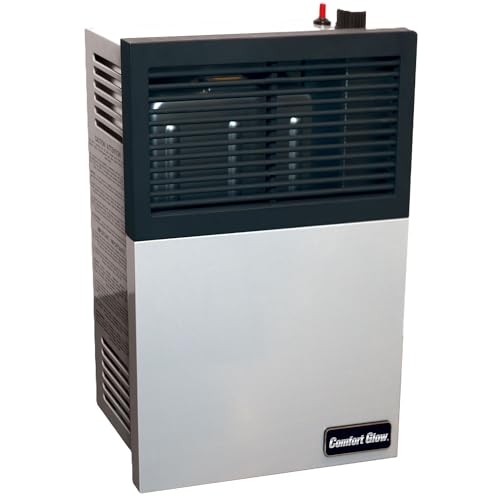
A gas heater for wall installation comes in two main types: direct-vent and vent-free. Direct-vent heaters pull combustion air from outside and vent exhaust back outside through a sealed pipe, making them safer for indoor use without room air contamination. Vent-free models burn gas with indoor air and release exhaust into the room, so they need special approvals and careful local code checks before installation.
A gas wall heater installation diagram for a direct-vent unit shows the sealed vent pipe passing through the wall with proper clearance and slope to prevent flue gas buildup. This setup is common for flued wall-mounted gas heaters installed through the wall, ensuring combustion gases never enter the living space.
Direct-vent propane and natural gas wall heaters like Product 2 and Product 3 heat defined room sizes efficiently without electricity. Product 2 offers 11,000 BTU and heats up to 350 sq. ft., while Product 3 delivers 17,000 BTU for up to 500 sq. ft. Both mount on walls, vent directly through the wall, and include safety features that stop gas flow if the pilot light goes out.
Vent-free gas heaters like Product 1 operate without a vent but must meet local safety and air quality rules. Many areas limit or prohibit their indoor use because they can affect indoor air quality. Confirm local codes before installing a vent-free model. Product 1 delivers 30,000 BTU for spaces up to 1,000 sq. ft. but is unsuitable where venting is required.
The gas type must exactly match the appliance’s rating plate. Propane and natural gas are not interchangeable without approved conversion kits and professional inspection. Installing a propane heater on natural gas or vice versa risks incomplete combustion, dangerous carbon monoxide, and voided warranties.
Multigas wall heaters installed together require careful planning. It’s safe if each heater matches its gas supply and venting requirements, and if the home’s gas line can handle the combined load. Always consult a professional to size the gas line and confirm venting compliance.
Avoid expecting a gas wall heater to warm your whole house. These heaters are designed to heat one room or a defined zone effectively. Overestimating coverage leads to cold spots and wasted fuel.
Find The Mistakes That Cause Leaks And Damage
Gas wall heater wiring, vent installation, and leak checks require precision to avoid damage and unsafe conditions.
For venting inside a wall, such as installing a C vent for a gas heater, follow the manufacturer’s exact routing and use only the listed parts. Improvising with mismatched vent components or altering the vent path is a common cause of leaks and dangerous carbon monoxide buildup.
Ventless wall heaters eliminate vent piping but must never block combustion air or exhaust openings. A blocked vent or missing outside cap can cause soot buildup, flame instability, or repeated shutdowns.
Gas fireplace installation inside a wall vent requires a sealed, correctly sized vent system. Similarly, installing a gas monitor heater calls for strict adherence to the listed vent and gas connection details to avoid leaks or damage.
Direct-vent units must use the vent parts supplied or approved by the manufacturer, following the exact installation diagram. Altering vent routes or parts invites dangerous leaks and voids warranty.
If you smell gas, see a sooty flame, or the heater repeatedly shuts off, stop immediately and call a professional.
When You Need A Licensed Pro
A licensed plumber or HVAC contractor is usually required for gas piping, venting through exterior walls, combustion-air solutions, and final startup.
Permits and inspections are a separate step from hiring a pro. You must get the permit and pass inspection even if you DIY the labor.
Adding a thermostat, running new electrical wiring, or opening finished walls often turns a small project into a larger job that needs professional help.
If you are looking for a plumber to install a gas wall heater near you, check local listings and verify licenses and insurance.
Gas wall heater installation costs typically range widely depending on complexity, venting, and local labor rates. For detailed cost expectations, see our guide on gas heater installation costs.
For those installing a gas heater wall unit without AC or searching a free installation guide, professional advice is still recommended for safety and code compliance.
Learn more about who should install gas wall heaters in our expert guide Who Installs Gas Wall Heaters? and plan your budget with the installation-cost page.
Questions People Ask
Who installs gas wall heaters?
Can I install a gas wall heater within distance of an electrical outlet?
How is a flued wall mounted gas heater installed?
When do I need a permit for gas wall heater installation?

I am a mechanical engineer and love doing research on different home and outdoor heating options. When I am not working, I love spending time with my family and friends. I also enjoy blogging about my findings and helping others to find the best heating options for their needs.
Related guides

How to Properly Vent a Gas Space Heater for Safety
To properly vent a gas space heater, ensure it is connected to a venting system that directs exhaust…
Top Picks for the Coziest Natural Gas Garage Heater
Budget heaters disappoint—but Mr. Heater F260550 and Reznor UDXC-250 impress. When it comes to natural gas garage heaters,…
Best Indoor Ventless Gas Heaters: Safety-First Guide (2026)
Feeling the chill? Discover how best indoor ventless gas heaters can warm your space efficiently. Mr. Heater MHVFBF30NGT…
