


Why One Thermostat Isn’t Enough
You know the feeling. The upstairs hallway reads 72°F while your home office sits at 78°F. The bedroom is freezing at night, but the living room feels like a sauna. This isn’t a quirk of your house—it’s a fundamental limitation of a single thermostat controlling a whole home. One sensor, one reading, one decision that ignores every other room.
This guide walks you through the actual mechanics of multi-zone climate control: how zones work, where to place sensors, what retrofit options exist, and what it really costs. You’ll learn how to map your rooms, choose between dampers and smart vents, and set up automations that respond to occupancy, time of day, and outdoor temperature. No vague advice—just numbers, trade-offs, and practical steps.
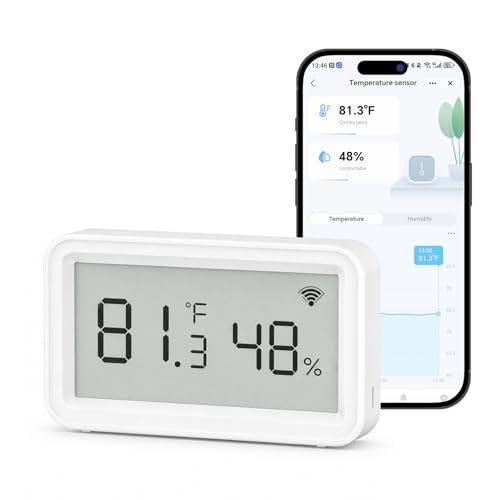
eMylo
eMylo WiFi Thermometer Hygrometer,Smart Indoor Temperature Humidity…
- Remote WiFi Monitoring - Anytime, Anywhere Track real-time temperature and humidity through the Smart Life/Tuya app over 2.4GHz Wi…
- Smart Alerts Keep You Informed - Set custom temperature and humidity thresholds and receive instant app notifications when conditi…
- Seamless Smart Home Automation - Use this samrt temperature humidity sensor as a trigger in Tuya scenes to automatically control c…
By the end, you’ll know whether zoning makes sense for your home, and if it does, how to design a system that doesn’t fight itself. You’ll also avoid the common mistakes that turn a good idea into a money pit.
A small tool that helps in this journey is the eMylo WiFi Thermometer Hygrometer. It’s a remote sensor that feeds temperature and humidity data into the Smart Life app, which can trigger your existing smart plugs or thermostats. It won’t replace a full zone controller, but it’s a low-cost way to start measuring the actual conditions in each room before you invest in bigger hardware.
The Core Concepts: Zones, Dampers, and Sensors
A zone is simply a group of rooms that share a single heating or cooling control point. In a single-zone system, the thermostat in the hallway dictates the furnace or AC for the entire house. Multi-zone splits that into two or more independently controlled areas.
The three critical components are:
- Temperature sensors – measure conditions in each zone. These can be wired, battery-powered, or WiFi-enabled like the eMylo.
- Dampers – mechanical flaps inside ductwork that open or close to direct airflow. Motorized dampers are controlled by a zone panel.
- Zone controller – the brain that reads sensors, compares to setpoints, and commands dampers and the HVAC unit.
Most people assume that adding a smart thermostat like a Nest or Ecobee gives them multi-zone control. It doesn’t. Those devices control a single HVAC unit based on one sensor (or a few remote sensors, but still one zone). True zoning requires physical dampers in the ducts and a controller that can modulate airflow.
System Architecture: From Single Thermostat to Multi-Zone Control
Let’s get technical. A typical retrofit for a two-zone system involves installing motorized dampers in the main supply ducts, a zone control panel, and either wired or wireless sensors in each zone. The panel communicates with your thermostat(s) and the HVAC equipment.
There are two common architectures:
- Dedicated zone panel – a separate box that manages dampers and communicates with the thermostat. This is the traditional approach, often used with Honeywell or EWC panels.
- Smart vent system – motorized vents replace standard registers. Each vent has its own sensor and can open or close based on room temperature. This is easier to retrofit but less efficient because it doesn’t modulate the blower speed.
Both have trade-offs. Zone panels are more robust and can handle bypass dampers, but they require professional installation and often cost more. Smart vents are DIY-friendly but can cause pressure imbalances if too many close at once.
The Role of the Hub and Cloud Connectivity
Your zone controller needs to talk to sensors and dampers. That communication can be wired (RS-485, 24V) or wireless (Zigbee, Z-Wave, WiFi). Cloud connectivity adds remote access and smart scheduling, but it also introduces a dependency: if the internet drops, does your system still work?
Most quality zone panels operate locally—they don’t need the cloud to function. Smart thermostats like Ecobee have local control for basic HVAC, but advanced features like geofencing and weather adjustments require the cloud. The eMylo sensor relies on WiFi and the Tuya cloud, so if your internet goes down, you lose remote monitoring and automations. That’s fine for a sensor, but for a zone controller, insist on local fallback.
Understanding Damper Control and Bypass Dampers
Dampers are simple devices, but they cause the most problems in zoning. When a zone calls for cooling, the damper opens. When it’s satisfied, it closes. If too many dampers close, the HVAC blower fights against closed ducts, increasing static pressure. That can lead to blower motor failure, duct leaks, or reduced airflow.
That’s where a bypass damper comes in. It’s a pressure-relief valve that diverts excess airflow when the system is running at low capacity. A properly sized bypass damper is critical for systems with more than two zones. Without it, you’ll hear whistling, feel weak airflow, or burn out the blower.
Another misconception: closing all dampers in unused rooms saves energy. In reality, forcing a single-speed blower to push air through fewer vents increases static pressure and makes the system work harder. Variable-speed blowers handle this better, but most existing systems aren’t variable-speed.
Planning Your Zone Map: Room-by-Room Strategy
Before buying anything, map your home. Walk each room and note the following:
- Sun exposure (south-facing rooms heat up more)
- Window quality (old single-pane vs. double-glazed)
- Ceiling height (tall ceilings trap heat)
- Occupancy patterns (home office during day, bedrooms at night)
- Existing duct runs (which rooms share the same trunk line?)
Group rooms into zones based on similar thermal characteristics and usage. A common approach:
- Zone 1: Living areas – living room, kitchen, dining (occupied during day)
- Zone 2: Bedrooms – all sleeping areas (occupied at night, need cooler temps)
- Zone 3: Bonus rooms – home office, gym, media room (intermittent use)
Don’t zone every room individually. That’s overkill for most homes. Two to three zones are usually enough to fix the classic hot/cold room complaints. Each zone adds cost and complexity, so be honest about which rooms actually have temperature problems.
Retrofit vs. New Construction: A Practical Guide
The biggest factor in your zoning strategy is whether you’re retrofitting an existing home or building new.
New construction: You have total freedom. You can design duct runs that serve single zones, install dampers at the plenum, and use a zone panel from day one. The extra cost is modest—maybe $500–$1,000 for a two-zone setup during the build. This is the best time to add zoning, because ductwork can be sized correctly for each zone.
Retrofit: This is where it gets tricky. If your home has a single HVAC unit with a single trunk line, you’ll need to add dampers in the main ducts. But if the ductwork is undersized or poorly routed, adding dampers may not solve the problem—you might just redirect the same inadequate airflow.
In a retrofit, the first step is a Manual J load calculation. This determines the heating and cooling load for each room. If your ducts are too small, no amount of zoning will fix that. You may need to add a duct run or increase the size of existing ones, which is invasive and expensive.
A less invasive alternative is the smart vent approach. These retrofit into standard registers and don’t require duct modification. But they have a downside: they don’t communicate with the HVAC blower, so the system may still run at full speed even when only one vent is open. That wastes energy and can cause pressure issues.
My honest advice: if your home has significant ductwork issues, fix those first. Zoning is a layer on top of a solid HVAC foundation, not a substitute for it.
Sensor Placement: The Difference Between Comfort and Chaos
Sensor placement is where most DIY zoning projects fail. Put a sensor in the wrong spot and your system will cycle on and off erratically, or leave you shivering in one room while another overheats.
Here’s what to avoid:
- Near vents or returns – you’ll read the conditioned air, not the room’s ambient temperature.
- Direct sunlight – a south-facing window will cook the sensor and trick the system into overcooling.
- Kitchens – stove heat and humidity cause false readings.
- Behind furniture – blocked airflow leads to stagnant, inaccurate readings.
- Exterior walls – drafts and insulation differences skew the numbers.
Instead, place sensors at about 5 feet off the floor, on an interior wall, away from heat sources and drafts. If you’re using a remote sensor like the eMylo, put it on a shelf or table in the center of the room. Give it a few days to calibrate—don’t change setpoints every hour.
One more thing: if you have a smart thermostat with remote sensors, the placement rules apply to those too. Many people stick them on a nightstand next to a lamp, which is fine, but avoid placing them directly above a baseboard heater or a vent.
The Real Cost of Zoning: ROI and Payback Period
Let’s talk money. The cost of a multi-zone system varies widely based on your home size, ductwork, and whether you DIY or hire a pro.
| System Type | Equipment Cost | Installation Cost | Annual Energy Savings | Payback Period |
|---|---|---|---|---|
| Smart Vents (retrofit, 2-3 zones) | $300–$600 | $0 (DIY) | 5–10% of HVAC bill | 2–4 years |
| Dampers + Zone Panel (retrofit) | $400–$800 | $500–$1,500 | 10–20% | 3–6 years |
| Full New-Construction Zoning | $500–$1,200 | Included in build | 10–20% | 1–3 years |
These numbers assume a 2,000 sq ft home with a typical HVAC bill of $150–$250 per month. The savings come from not heating or cooling unused rooms, and from reducing cycling (the system runs longer but less often, which is more efficient).
But here’s the catch: energy savings alone may not justify the cost. The real value is comfort. If you’re constantly adjusting the thermostat, or if one room is unusable in summer, zoning pays for itself in quality of life. That’s not a financial metric, but it matters.
Also, don’t forget maintenance. Dampers need occasional lubrication, and sensors batteries need replacing. Budget $20–$50 per year for upkeep.
Smart Scheduling and Geofencing: Automating Your Comfort
Once you have zones, you can automate them. The most powerful tool is smart scheduling—setting different setpoints for each zone based on time of day.
For example, during the workday, your home office zone stays at 72°F while the rest of the house drops to 65°F. At 5 PM, the living areas warm up to 70°F, and at 10 PM, the bedroom zone cools to 68°F. This is where the real energy savings happen, because you’re not conditioning empty rooms.
Geofencing takes it further. Your phone’s location tells the system when you’re leaving or approaching home. When you leave, all zones drop to an away setpoint. When you’re 10 minutes away, the system starts bringing zones back to comfort levels. This works well with a smart thermostat or a zone controller that supports geofencing.
The eMylo sensor can trigger automations in the Tuya app. For example, if the sensor in your living room reads above 80°F, you can have a smart plug turn on a fan. Or if the humidity in your basement exceeds 60%, a dehumidifier kicks on. It’s a simple trigger-action system, but it’s surprisingly effective for single-room control.
One caveat: don’t over-automate. Set a schedule, but also give yourself a manual override. If you’re home sick on a Tuesday, you don’t want the system dropping to 65°F because the calendar says you should be at work. Most smart thermostats have a hold feature—use it.
Integration and Protocols: Matter, Zigbee, and the Future
The protocol war is real. Your sensors, dampers, and thermostats need to communicate, and they don’t all speak the same language.
- Zigbee – low-power mesh, widely used in home automation. Good range, but requires a hub. Common in Tuya devices.
- Z-Wave – similar to Zigbee, but uses a different frequency (908 MHz in the US) and is more strictly certified. Interoperability is better, but fewer devices.
- WiFi – direct connection to your router, no hub needed. Simple, but uses more power and can congest your network. The eMylo uses WiFi.
- Matter – the new standard that promises to unify everything. It runs over Thread (a mesh protocol) or WiFi. Still maturing, but it’s the future for smart home devices.
For climate control, I’d lean toward Zigbee or Z-Wave for sensors because they’re battery-friendly and reliable. WiFi sensors are fine for a single room, but if you’re building a multi-zone system, a mesh protocol is more robust.
Matter is worth watching. If you’re buying new gear, look for Matter certification. It’s not perfect yet—some devices still have bugs—but it’s the best bet for avoiding ecosystem lock-in.
One practical tip: whatever protocol you choose, make sure your hub or controller is compatible with your existing smart home platform (Alexa, Google, HomeKit). You don’t want to buy a Zigbee sensor that can’t talk to your Z-Wave thermostat.
Troubleshooting: When Your System Fails (and How to Fail Safe)
Systems fail. The question is what happens when they do.
If your WiFi drops, the eMylo sensor stops reporting to the app, but it still shows readings on its display. That’s fine. But if your zone controller relies on cloud services for scheduling, a cloud outage could leave your home without climate control. That’s why local control matters.
Most zone panels have a fail-safe mode: if they lose communication with sensors, they open all dampers and run the HVAC as a single-zone system. That’s good. But some cheap smart vents default to closed, which could freeze your pipes in winter if they lose power. Check the fail-safe behavior before buying.
Here’s a common failure scenario: a sensor battery dies, and the zone controller thinks the room is at 50°F. It calls for heat, but the room is actually 75°F. The system runs until the other zones overheat. To prevent this, set a temperature range in the controller. If a sensor reads outside that range, treat it as faulty and ignore it.
Another issue: dampers get stuck. They’re mechanical, and after a few years, they can jam. If you hear a buzzing sound from the ductwork, that’s a damper motor struggling. Lubricate the linkage and check for obstructions.
For a detailed look at how smart systems handle these failure modes, check out this temperature maintenance guide.
Maintenance Checklist for Long-Term Efficiency
Zoned systems aren’t set-and-forget. Here’s what to do every season:
- Replace sensor batteries – most use AA or CR2032, last 1-2 years. Set a reminder.
- Clean dampers – remove dust and debris from the blades. Use a dry cloth.
- Check airflow – hold your hand over each vent. Weak airflow means a closed damper or a clogged filter.
- Update firmware – smart devices get bug fixes. Check the app for updates.
- Calibrate sensors – compare readings to a known-good thermometer. Adjust in the app if they drift.
- Inspect ductwork – look for leaks at joints. Seal with foil tape, not duct tape.
If you use a WiFi sensor like the eMylo, check the data history periodically. A spike in humidity or temperature can indicate a problem before it becomes serious.
FAQ: Common Questions About Zone Management
Can I add zoning to my existing HVAC system?
Yes, in most cases. The main requirement is accessible ductwork. If your main supply ducts are in the attic or basement, dampers can be installed. If they’re buried in walls or floors, it’s much harder. A professional HVAC contractor can assess feasibility.
What’s the difference between a smart thermostat and a zone controller?
A smart thermostat controls one HVAC unit based on its own sensor. A zone controller manages multiple zones, each with its own sensor and damper. You can use a smart thermostat as the control interface for a zone panel, but the thermostat alone doesn’t create zones.
How many zones do I need?
Most homes only need two or three. The goal is to group rooms with similar thermal characteristics and occupancy patterns. More zones mean more cost and more maintenance, so don’t overdo it.
Will zoning save me money on my energy bill?
Typically, yes—10–20% on heating and cooling costs. But the payback depends on your usage patterns. If you’re already good about setting back the thermostat when away, the savings are smaller. The bigger win is comfort.
What happens if the cloud service goes down?
For a simple sensor like the eMylo, you lose remote access and automations, but the display still works. For a zone controller, make sure it has local control. Most do, but some budget models require a cloud connection for scheduling. Read the specs carefully.
Putting It All Together: Your Next Steps
Zoning isn’t a luxury anymore. With the right sensors, dampers, and a bit of planning, you can fix the hot and cold spots that plague most homes. Start small: measure the actual temperatures in each room for a week. You’ll likely find that the problem is worse than you thought.
- Map your zones based on sun exposure and usage patterns, not room names.
- Invest in a reliable sensor system—the eMylo is a solid entry point for monitoring.
- Consider retrofit dampers if your ductwork allows, or smart vents for a simpler install.
- Set up schedules that match your daily routine, and use geofencing to save energy when you’re away.
- Always check the fail-safe behavior of any device before buying.
- Maintain your system: batteries, filters, and damper lubrication are non-negotiable.
- If you’re building new, add zoning during construction—it’s cheap and prevents headaches later.
For more on how smart systems interact with your HVAC, read about smart temperature control systems. And if you’re weighing different devices, this smart system benefits overview covers the trade-offs.
The perfect temperature isn’t a single number. It’s a system that adapts to how you live. Zoning gives you that control. Start with measurements, then build from there.

I am a mechanical engineer and love doing research on different home and outdoor heating options. When I am not working, I love spending time with my family and friends. I also enjoy blogging about my findings and helping others to find the best heating options for their needs.
Related guides

15 Proven Ways to Regulate Home Temperature Efficiently
To efficiently regulate home temperature, use programmable thermostats, seal leaks, insulate well, and utilize fans for better airflow.…
7 Key Benefits of Maintaining a Stable Home Temperature
A stable home temperature enhances comfort, improves sleep quality, reduces energy costs, and protects your home's structure and…
Home Temperature Control Methods for Every Season
Keeping your home comfortable isn't just about turning a dial. It's a deliberate balance of technology, design, and…