

You need to measure temperature in a process, a room, or a piece of equipment. Walk into any supplier’s catalog and you’ll face hundreds of probes, transmitters, and sensor types. Pick wrong and you’ll chase drift, fight noise, or replace the sensor every month. Pick right and it just works for years.
This guide walks you through the decision like an engineer would: start with the application, then match the sensing element, probe construction, and signal output. You’ll leave with a clear method, not just a list of specs. We’ll cover the four main sensor types, a side-by-side comparison table, probe materials, installation mistakes, and how to choose between a raw output and a 4-20mA transmitter.
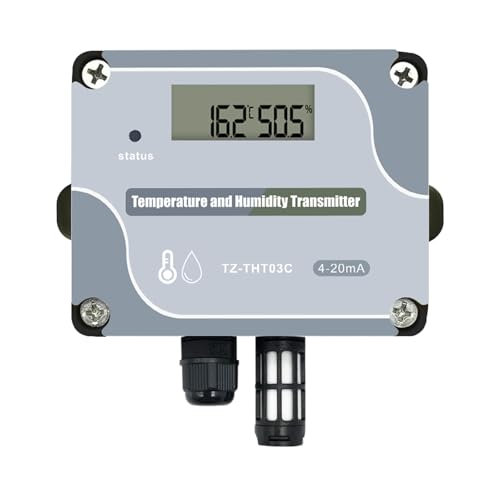
Tzone
Tzone 4-20mA Temperature Humidity Transmitter Industrial Analog…
- 4-20 mA Temperature Humidity Sensor: Analog signal output,makes the sensor has the characteristics of strong anti-interference abi…
- Measurement Range: Temperature measuring range is -40 ℃ to 125 ℃; Humidity measuring range is 5% to 95% RH; Power Supply Voltage i…
- 4-20 mA Temperature Transmitter: Adopts industrial grade CMOS chip SHT30 sensor, which improves its stability and reliability in h…
One practical shortcut: if you need a wall-mounted, industrial-grade sensor with both temperature and humidity, a 4-20mA temperature humidity transmitter like the Tzone model combines an SHT30 CMOS sensor, LCD display, and a rugged housing—ready to wire into a PLC or controller right out of the box.

Start with the Application, Not the Sensor
Every temperature sensor is a compromise. The best choice depends on four questions, in this order:
- What temperature range do you actually need? Don’t buy a sensor rated for 1000°C if your process runs at 150°C. You’ll pay extra and lose accuracy at the low end.
- How accurate must the reading be? A lab calibration needs ±0.1°C. A warehouse monitor might be fine with ±1°C. That difference changes the sensor family entirely.
- How fast must the sensor respond? A slow sensor misses spikes. A fast sensor picks up noise. Match the response time to the process dynamics.
- What’s the environment like? Vibration, moisture, chemicals, and electromagnetic interference all affect sensor choice and probe construction.
Answer these four and you’ve narrowed the field to maybe two options. That’s the whole trick.
The Big Four: RTDs, Thermocouples, Thermistors, and Thermostats
RTDs: The Precision Standard
Resistance temperature detectors (RTDs) measure temperature by tracking the resistance of a pure metal—usually platinum. The relationship is nearly linear, which makes them accurate and repeatable. A PT100 RTD changes resistance by about 0.385 ohms per °C, and you can read that with a decent multimeter or transmitter.
RTDs shine from -200°C to 600°C. They beat thermocouples in stability and accuracy, especially in the -50°C to 300°C range where most industrial processes live. The downside: they’re slower to respond and more fragile. The sensing element is a thin wire coil, so heavy vibration can break it. They also cost more than thermocouples of similar range.
Use an RTD when you need repeatable readings over years, like in HVAC control, food processing, or pharmaceutical storage. If your process stays under 400°C and accuracy matters more than raw speed, an RTD is the safe choice.
Thermocouples: The Extreme-Range Workhorse
Thermocouples consist of two dissimilar metal wires joined at a junction. Heating that junction produces a small voltage—millivolts—that correlates with temperature. They’re cheap, rugged, and handle enormous ranges. Type K covers -200°C to 1260°C. Type R and S go beyond 1400°C.
But thermocouples have quirks. The voltage output is nonlinear, so you need a lookup table or a transmitter with built-in linearization. The reference junction (where the wires connect to the measuring instrument) must be compensated—cold junction compensation is non-negotiable. And accuracy suffers over time as the metals oxidize, especially at high temperatures.
Use a thermocouple when you need to measure above 600°C, when the sensor might get damaged so cost matters, or when response time is critical—bare-wire thermocouples react in milliseconds. For furnace control, engine exhaust, or kiln monitoring, a thermocouple is the standard.
Thermistors: The Narrow-Range Specialist
Thermistors are ceramic semiconductors whose resistance drops sharply as temperature rises. That steep resistance change makes them extremely sensitive—a typical NTC thermistor can resolve 0.01°C changes. They’re also tiny and cheap.
The catch: their range is narrow, usually -50°C to 150°C, and their response is highly nonlinear. Beyond 150°C, they drift and degrade. They also self-heat if you pass too much current through them, which skews readings.
Use a thermistor for medical probes, battery packs, or any application where you need fine resolution in a limited range. Just don’t push one past its rated maximum—it won’t fail gracefully.
Thermostats: The Simple On/Off Switch
Thermostats aren’t really sensors—they’re switches that open or close at a set temperature. A bimetallic strip bends, a mercury switch tips, or an electronic comparator trips. No continuous output, no data logging, just on or off.
They’re perfect for safety cutoffs, simple HVAC control, or any place where you just need to keep something from overheating. The downsides: hysteresis (the switch point differs between rising and falling temperature) and no way to know the actual temperature, only whether it crossed the threshold.
If you need a simple interlock or a low-cost high-limit switch, a thermostat is fine. If you need to log or control continuously, pick one of the other three.
The Decision Matrix: Comparing Cost, Range, Accuracy, and Speed
Here’s the comparison table I wish someone had handed me years ago. Scores are relative—use them to shortlist, not to overthink.
| Criterion | RTD (PT100) | Thermocouple (Type K) | Thermistor (NTC) | Thermostat |
|---|---|---|---|---|
| Temperature range | -200°C to 600°C | -200°C to 1260°C | -50°C to 150°C | Set point dependent |
| Accuracy (typical) | ±0.1°C to ±0.5°C | ±1°C to ±2°C | ±0.1°C to ±0.5°C | ±1°C to ±5°C |
| Response time | Slow (1-10 s) | Fast (0.1-1 s) | Fast (0.1-2 s) | Slow (mechanical) |
| Stability over time | Excellent | Good, but drifts at high temps | Good, but degrades above 150°C | Good, but mechanical wear |
| Linearity | Near linear | Nonlinear | Highly nonlinear | N/A |
| Cost | $$$ | $ | $ | $ |
| Typical use | Process control, HVAC, lab | Furnaces, exhaust, high temp | Medical, battery, limited range | Safety cutoffs, simple control |
Notice the pattern: you can’t get everything. High accuracy and wide range cost money or speed. Fast response usually means a thin, fragile probe. Decide what you can’t live without, then accept the trade-offs.
Beyond the Element: Probes, Sheaths, and Environmental Protection
The sensing element is only half the story. The probe—the sheath, insulation, and connection head—determines whether the sensor survives its environment. Here’s what to consider:
- Stainless steel (304 or 316) is the default for most probes. It resists corrosion, handles temperatures up to about 850°C, and is cheap. Use it for dry, non-corrosive processes.
- Inconel handles higher temperatures (up to 1200°C) and resists oxidation better than stainless. It’s more expensive, but worth it for furnace or exhaust applications.
- Ceramic or quartz sheaths are for extreme temperatures above 1000°C or where electrical insulation is critical. They’re brittle—handle with care.
- For chemical or abrasive environments, consider a thermowell—a protective tube that isolates the sensor from the process. It adds response time but protects against corrosion, pressure, and mechanical damage.
Also check the insulation inside the probe. Mineral-insulated (MI) cables use magnesium oxide powder—they’re rugged and can be bent. Polymer insulation is cheaper but limits temperature and can absorb moisture.
One pro tip: if your process involves vibration, choose a probe with a robust sensing element (like a wire-wound RTD instead of a thin-film one) and a stainless steel sheath for protection. Vibration is the silent killer of RTDs.
Installation Errors That Ruin Accuracy (and How to Avoid Them)
You can buy the best sensor on the market and still get garbage readings if installation is sloppy. Here are the most common mistakes I’ve seen:
- Insufficient immersion depth. The sensing element must be fully inside the medium. For a thermowell, the rule of thumb is 10 times the diameter of the probe. If you insert it too shallow, you’re measuring the wall temperature, not the fluid.
- Missing thermal paste or compound. Air gaps between the sensor and its thermowell or mounting surface create a thermal resistance that slows response and introduces error. Fill the gap with thermally conductive paste.
- Thermal shunting. A long, thick probe can conduct heat away from the measurement point, cooling it below the actual temperature. Use a smaller probe or install it perpendicular to the flow.
- Ignoring self-heating. For RTDs and thermistors, the measurement current itself heats the element. Keep the current low (typically 1 mA or less) and wait for the reading to stabilize.
- Poor wire routing. Run sensor wires away from power cables and motors to avoid electromagnetic interference. Twisted-pair or shielded cable helps, especially for low-level signals like thermocouple millivolts.
Take the extra ten minutes to do it right. The accuracy you save is your own.
Signal Transmission: Raw Outputs vs. 4-20mA Transmitters
Once the sensor measures temperature, you need to get that signal to a controller or display. You have two basic options:
- Raw outputs (resistance for RTDs, millivolts for thermocouples) are simple and cheap. But they’re susceptible to noise, voltage drops over long wires, and require the receiver to do linearization and cold junction compensation.
- 4-20mA transmitters convert the sensor’s signal to a current loop. The current is immune to wire resistance and noise because it’s a loop—the same current flows regardless of cable length. Plus, the loop can also power the transmitter (two-wire loop), so you don’t need a separate supply.
If your sensor sits more than a few meters from the controller, or if the environment has motors, drives, or other electrical noise, use a 4-20mA transmitter. It’s the industry standard for industrial process control for good reason. You lose a little resolution compared to a raw digital output, but you gain reliability.
For example, a wall-mounted 4-20mA transmitter like the Tzone unit combines the sensor and transmitter in one package, so you just wire the loop to your PLC or controller. The LCD display lets you verify the reading locally without extra tools.
The 5-Question Checklist Before You Buy
Run through these five questions before you spend money on any temperature sensor. If you can’t answer them, you’re not ready to buy.
- What is the exact temperature range, including transients? Don’t just consider the normal operating range—think about startup, shutdown, or fault conditions that might spike higher.
- What accuracy do I truly need? Write down the number. Then check if the sensor’s total error (including drift and cold junction error, if applicable) meets it.
- How fast must the sensor respond to changes? If you’re controlling a fast process, a slow RTD might cause overshoot. If you’re monitoring a stable environment, speed doesn’t matter.
- What is the environment—moisture, chemicals, vibration, EMI? Match the probe sheath and insulation to the conditions. A waterproof, dustproof housing is essential for outdoor or washdown areas.
- How will the signal be transmitted? Choose raw output for short, clean runs. Choose 4-20mA for long distances or noisy environments.
Answer these and you’ll know exactly which sensor family and configuration you need. No guesswork.
Conclusion: Matching the Sensor to the Real-World Conditions
Choosing the right temperature sensor comes down to being honest about your requirements. Don’t let a datasheet’s impressive range seduce you into overbuying. Start with the application, then let the environment and signal requirements narrow the field.
- Use an RTD for precision and stability from -200°C to 600°C.
- Use a thermocouple for extreme heat or when cost is the priority.
- Use a thermistor for narrow ranges where sensitivity matters more than range.
- Use a thermostat only for simple on/off control.
- Pick a probe sheath that survives your environment—stainless for most, Inconel for high heat, ceramic for extreme conditions.
- Install with proper immersion depth, thermal paste, and shielding to avoid measurement errors.
- Choose a 4-20mA transmitter for long distances or noisy industrial settings; it’s the industry standard for good reason.
And if you’re monitoring temperature and humidity in a building, lab, or warehouse, a combined transmitter like the Tzone 4-20mA unit saves you from buying two separate sensors. Just check the specs against your needs and wire it up.

I am a mechanical engineer and love doing research on different home and outdoor heating options. When I am not working, I love spending time with my family and friends. I also enjoy blogging about my findings and helping others to find the best heating options for their needs.
Related guides

Why Temperature Sensors Are Essential in Every Laboratory
Temperature sensors are crucial in laboratories as they ensure accurate monitoring and control of temperature-sensitive experiments and processes,…
Temperature Sensors for Climate Research: Precision Tools for a Warming Planet
Temperature sensors for climate research are essential tools that measure atmospheric temperatures, enabling accurate data collection for climate…
How Temperature Sensors Revolutionize Wearable Technology
Temperature sensors in wearable technology monitor body heat for health tracking, enhancing fitness insights, and detecting fever or…
