

It’s 2 AM, the temperature dropped to 14°F, and you’re shivering inside a sleeping bag that was supposed to be rated for 20°F. You can see your breath. The tent walls are frosty. You start wondering if that little propane heater you left at home was worth the risk after all.
Heating a tent is a different beast than heating a cabin. You’re dealing with fabric that can melt, a confined space with limited oxygen, and the very real threat of carbon monoxide poisoning. But with the right gear and a clear head, you can stay warm without turning your tent into a hazard zone. This guide covers the four main approaches—propane radiant heaters, wood stoves, electric/battery units, and the no-heater strategy—and helps you pick the right one for your tent, your trip, and your tolerance for weight and risk.
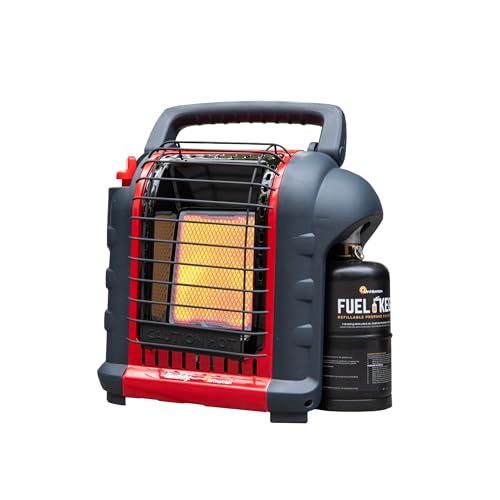
Mr. Heater
Mr. Heater 9,000 BTU Portable Buddy Radiant…
- Emits 4,000 or 9,000 BTU/hr radiant heat
- Designed and approved for indoor and outdoor use
- Heats up to approximately 225 square feet
You’ll walk away knowing exactly how to set up each method, what mistakes will kill you (literally), and how to test everything before you leave the driveway.
One of the most popular solutions for car campers and base campers is a propane radiant heater like the Mr. Heater 9,000 BTU Portable Buddy. It’s designed for indoor use with proper ventilation, features an emergency low-oxygen shutoff, and cranks out enough heat for a 225-square-foot tent. It’s not a mountaineering tool—it’s a comfort tool for when weight isn’t the main concern.

The Golden Rule: Ventilation and Carbon Monoxide Safety
Every heating method in this article has one thing in common: it consumes oxygen or produces combustion byproducts. Even a candle flame does. The moment you seal a tent completely, you’re asking for trouble.
Carbon monoxide is colorless, odorless, and bonds to your hemoglobin roughly 200 times faster than oxygen. You don’t feel yourself suffocating. You get a headache, then drowsy, then you don’t wake up. That’s not fear-mongering; that’s the mechanism.
Here’s the non-negotiable setup for any combustion heater:
- Keep at least one vent open. Most tents have a top vent or a door you can crack. You need cross-flow, not just a tiny hole.
- Run a battery-powered carbon monoxide detector. Place it at sleeping head height, about a foot off the ground. Test it before the trip.
- Never run a heater while you sleep. The exception is a wood stove with a proven, fully sealed pipe system, and even then, experienced users weigh the risk carefully.
- Keep the heater at least three feet from the tent walls. Radiant heat will melt nylon at contact. Polyester melts around 480°F; nylon around 430°F. A heater surface gets far hotter than that.
Propane heaters are technically rated for indoor use, but that rating assumes some fresh air exchange. A sealed, modern double-wall tent can drop oxygen levels fast. Crack a vent. Always.
Condensation is the other hidden enemy. Every BTU of heat from combustion produces water vapor. Burning one pound of propane creates about 1.6 pounds of water. That moisture ends up on your sleeping bag, your clothes, and your tent ceiling. Ventilation is the only cure. If you wake up with dripping walls, you didn’t vent enough.
Method 1: Propane Radiant Heaters (The Popular Choice)
The Mr. Heater Buddy series dominates this category for good reason. It’s compact, puts out a serious amount of radiant heat, and has a low-oxygen shutoff that gives you a fighting chance if ventilation fails.
Pros, Cons, and Safe Setup
Pros:
- Instant heat. No waiting for a stove to warm up.
- Light enough to carry (about 9 pounds for the 9,000 BTU model).
- Runs on disposable 1-pound propane cylinders or a 20-pound tank with a hose adapter.
- The low-oxygen safety system is a real feature, not a gimmick.
Cons:
- Burns through fuel. A 1-pound cylinder lasts about 5.6 hours on low (4,000 BTU) and about 2.8 hours on high (9,000 BTU). Bring spares.
- Radiant heat only warms what’s directly in front of it. You’ll be toasty on one side and cold on the other.
- It’s a fire hazard if tipped over. The Buddy has a tip-over switch, but you still need a stable, flat surface.
Safe setup is straightforward. Place the heater on a non-flammable surface—a piece of plywood or a metal baking sheet works. Keep it away from sleeping bags, clothes, and tent walls. Point it toward the center of the tent, not at the fabric. Crack the top vent and the door zipper about two inches. Run the detector. Test the low-oxygen shutoff before you rely on it: light the heater, hold a candle near the sensor, and confirm it clicks off.
The 1-pound cylinders are convenient but wasteful. A 20-pound tank with a 12-foot hose sits outside the tent, which also keeps the weight inside lower. Just make sure the hose doesn’t kink in the cold.
Method 2: Wood-Burning Stoves (The Luxury Option)
If you’re base camping with a group or pulling a sled, a wood stove changes the game. It throws dry heat, boils water, dries socks, and creates a focal point for the tent. It also costs a fortune, weighs a ton, and demands respect.
Weight, Cost, and Installation Considerations
A titanium stove like the Seek Outside or a steel stove from Winnerwell weighs between 10 and 25 pounds, plus pipe. A full stove pipe kit adds another 5 pounds. That’s not backpacking gear. That’s car camping or expedition sled hauling.
Cost is real. A quality stove with a spark arrestor and proper pipe runs $300 to $700. Cheap knockoffs have thinner metal that warps and thinner pipe that burns through. You get what you pay for.
Installation is the tricky part. You need a stove jack—a heat-resistant fabric panel sewn into the tent roof. Many hot-tent tents (like those from Luxe or Kodiak) come with a pre-installed jack. If your tent doesn’t have one, you’re cutting into your tent and sewing in a patch. That’s not a weekend project.
The pipe must extend at least two feet above the tent peak, and the stove needs a spark arrestor to catch embers. The area around the stove jack needs constant monitoring. Wood stoves radiate enormous heat; a tent wall touching the pipe will melt or catch fire in seconds.
The payoff is a tent that stays at 70°F while it’s 10°F outside. You can cook, dry out, and sleep in a t-shirt. But you’ll wake up every few hours to feed the fire. That’s the trade-off.
Method 3: Electric and Battery-Powered Heaters (The Convenient Option)
Electric heaters work great in one scenario: you’re camping next to your vehicle with a power source, or you’re in a camper van with a shore power hookup. They produce zero combustion gases, which eliminates the carbon monoxide risk entirely. You still have to manage condensation and fire danger, but the CO worry disappears.
A 1,500-watt space heater puts out about 5,100 BTU/hr, which is plenty for a large tent. But it draws 12.5 amps. A standard car outlet can’t handle that. You need a generator, a solar setup with a large inverter, or a campsite with electric hookups. A car battery with a 400-watt inverter will run a small 200-watt heater for maybe two hours before the battery is drained. That’s not useful.
Battery-powered heaters are mostly a gimmick. A 500-watt-hour power station runs a 200-watt heater for about two hours. That’s not a night of warmth. That’s a warm hour before bed. The math doesn’t work for whole-night heating.
Use electric heat for a quick warm-up before sleep, then rely on your sleeping bag. That’s the realistic sweet spot.
Method 4: The “No-Heater” Approach (Heat Retention & Body Heat)
This is the baseline. Every other method is a supplement to this one. If you can’t sleep warm without a heater, you’ll struggle with one too, because heaters cycle and shut off, and your body still needs to retain heat.
Layering, Sleeping Pads, and Hot Water Bottles
Your sleeping bag doesn’t generate heat. It only slows heat loss. Your body is the furnace. So the first step is fueling that furnace. Eat a high-fat, high-protein snack before bed. Fat burns slowly and keeps you warm for hours. A handful of nuts and a piece of cheese beats a granola bar.
Your sleeping pad matters more than your bag. The ground conducts heat away from your body far faster than air. A foam pad has an R-value of about 2. An inflatable pad with insulation runs R-4 to R-6. In winter, stack a closed-cell foam pad under an inflatable pad. That combination hits R-7 or higher and stops the cold from seeping up through your spine.
Wear a dry base layer to bed. Never sleep in the clothes you hiked in. Sweat is a heat thief. Change into a fresh, dry wool or synthetic layer. Add a hat. You lose a huge percentage of body heat through your head and neck.
Hot water bottles are the cheapest luxury in winter camping. Boil water, pour it into a Nalgene bottle, wrap it in a sock, and put it in your sleeping bag 15 minutes before you get in. That bottle stays warm for hours and pre-heats your bag. It’s not a heater, but it does the job of one for the first few critical hours of sleep.
If you do all this and you’re still cold, that’s when a heater earns its place.
How to Choose the Right Method for Your Tent
There’s no universal answer. The right method depends on your tent’s size, your trip’s duration, your weight tolerance, and your risk appetite. A 4-season mountaineering tent with a vestibule is different from a giant canvas wall tent.
A Decision Matrix for Tent Type and Trip Length
| Method | Weight | Cost (Entry) | Heat Output | CO Risk | Best For |
|---|---|---|---|---|---|
| Propane Radiant (e.g., Mr. Heater Buddy) | 9-15 lbs | $80-$150 | 4,000-9,000 BTU | Moderate (requires ventilation) | Car camping, base camp, 1-3 nights |
| Wood Stove | 15-30 lbs (plus pipe) | $300-$700 | 10,000-20,000 BTU | Low (if sealed correctly) | Base camp, group trips, long stays |
| Electric (1500W) | 2-5 lbs | $30-$80 (plus power source) | ~5,100 BTU | None | Vehicle-adjacent camping, RV hookups |
| No-Heater (layering + hot water) | 0 lbs | $0 (already have gear) | N/A (retains body heat) | None | Backpacking, ultralight, short trips |
For a solo backpacker, the no-heater approach is the only sane choice. For a family car camping in a 6-person tent, a propane heater with a 20-pound tank is the sweet spot. For a week-long ice fishing trip with a wall tent, a wood stove is worth every pound.
If you’re in a single-wall tent, be extra careful. Single-wall tents breathe less than double-wall tents, which means worse condensation and more risk with combustion heaters. Double-wall tents have a fly that creates an air gap, which helps manage moisture and heat transfer.
Extreme Conditions: Altitude, Sub-Zero Temps, and Condensation
At 10,000 feet, the air is thinner and colder. Propane heaters still work, but the output drops because the oxygen supply is reduced. You’ll burn more fuel for the same heat. A 1-pound cylinder that lasts 5.6 hours at sea level might last 4.5 hours at altitude.
Propane itself gets sluggish below 0°F. The vapor pressure drops, and the regulator can’t pull enough gas. The heater sputters or won’t light. A 20-pound tank on its side (with the correct vapor withdrawal) or a tank warmer—a simple insulated sleeve—helps. Don’t use a propane tank heater; those are for forklift tanks and can overpressurize the cylinder.
Wood stoves actually perform better at altitude. They don’t rely on vapor pressure. They just need a good draft, and the thinner air means less wind resistance on the flue. Just make sure your firewood is dry. Wet wood at altitude is a recipe for a smoky, useless fire.
Condensation is worse in extreme cold. The temperature differential between your warm body and the cold tent wall is huge, so moisture condenses aggressively. A wood stove is the best cure because it produces dry heat. Propane produces wet heat. Electric heat produces dry heat but costs a fortune to run.
If you’re using a propane heater at sub-zero temps, expect ice to form on the tent walls. That’s not a failure; that’s physics. Ventilate a bit more than you think you need, and shake off the ice in the morning before it melts onto your gear.
Final Safety Checklist and Testing Protocol
Don’t learn your heating setup fails on the first night of a trip. Test everything at home or in the backyard first. It takes an hour and saves you a miserable, dangerous night.
- Set up your tent in the yard. Pitch it exactly as you would in the field.
- Place your heater inside. Check clearances: three feet from walls, one foot from sleeping bags, stable surface.
- Crack the vents and the door zipper. Set up your carbon monoxide detector at sleeping height.
- Run the heater for 30 minutes. Watch the detector reading. It should stay at zero or near zero. If it climbs above 5 parts per million, you need more ventilation.
- Check the tent walls for excessive heat. Touch the fabric near the heater. If it’s too hot to hold your hand against, move the heater.
- Test the low-oxygen shutoff on a propane heater by holding a candle flame near the sensor. It should trip within seconds.
- Do a dry run of your sleeping setup. Get in your bag, use your hot water bottle, and see if you’re actually warm.
Then, before every trip, run through this checklist:
- Carbon monoxide detector has fresh batteries.
- Heater has no dents, cracks, or damaged hoses.
- Propane cylinders are full (weigh them or check the float gauge).
- Stove pipe sections fit snugly and the spark arrestor is clean.
- Tent vents are unblocked and zippers work.
- You have a fire extinguisher or a bucket of snow/water within reach.
Heating a tent is a calculated risk. You can minimize it with ventilation, detectors, and smart gear choices. The warmest night of your life could be in a tent with a wood stove crackling. The last night of your life could be in a tent with a sealed propane heater. The difference is a few inches of open zipper and a $30 detector.
Choose accordingly.

I am a mechanical engineer and love doing research on different home and outdoor heating options. When I am not working, I love spending time with my family and friends. I also enjoy blogging about my findings and helping others to find the best heating options for their needs.
Related guides

Best Way to Keep Heat Out of House in 2026
Discover the best products and methods to keep heat out of your house, cutting cooling costs and boosting…
Transform Your Home: The Best DIY Heat Pump Reviewed!
Ready to save on energy bills? Check out the best DIY heat pump solutions that will keep your…
Cozy and Warm: The Best Heated Pet Bed Ever!
Looking for the best heated pet bed? Keep your furry friend cozy and warm this winter with our…
