

You changed the air filter last month, vacuumed the living room twice, and still find a fine gray dust settling on your TV stand within days. The culprit might not be your housekeeping. It’s likely your ductwork — the hidden network of metal and flexible tubing that carries heated and cooled air through your home. When that system collects dust, pet dander, and debris, it doesn’t just sit there. It recirculates, and you breathe it.
Most homeowners don’t think about their ducts until something goes wrong — a musty smell, a sudden spike in energy bills, or a family member’s allergies getting worse. By then, the problem has usually been building for months. This article covers what actually matters: how often to clean, what warning signs demand immediate action, what a fair price looks like, and how to verify the job was done right. You’ll walk away with a practical decision matrix, not generic advice.
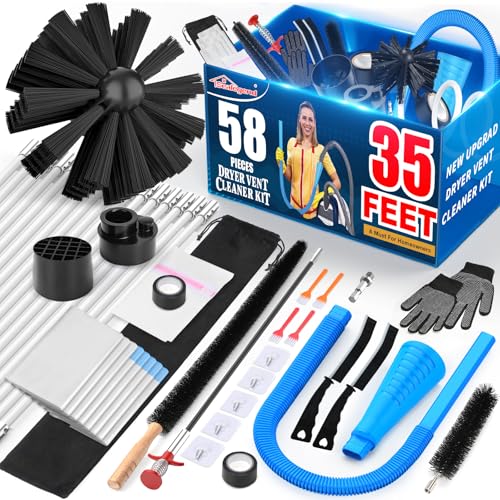
Sealegend
Sealegend 58-Pieces 35-Feet Dryer Vent Cleaner Kit,…
- 【Efficient dryer cleaning tool set】-Professional cleaning tool set can help you deep clean buildup lint in the dryer. Including 35…
- 【35Feet Dryer Vent Brush】- Easy to use with your drill, the flexible nylon rods can be quickly connected and extended to 35ft.Incl…
- 【Dryer Lint Vacuum Attachment】 - Easy to connect and suitable for most vacuum cleaners except for some dyson and shark vacuum clea…
If you’re tackling the dryer vent portion of your duct system, a dedicated kit like the Sealegend dryer vent cleaner kit can handle the job without calling a technician. It includes flexible rods that reach 35 feet, a lint vacuum attachment, and brushes for the trap and exhaust port — everything you need for a thorough DIY cleaning session.

Why Ductwork Maintenance Matters More Than You Think

Your HVAC system moves air through the ductwork continuously. Every time the furnace or air conditioner runs, it pulls air from the rooms, passes it through the filter, and pushes it back out through the supply registers. The ductwork is the highway for that air. If the highway has potholes of dust, clumps of hair, or worse — mold — every vehicle on it picks up the contamination.
The Environmental Protection Agency notes that duct cleaning is not always necessary, but it becomes important when you notice visible mold growth inside the ducts, infestation by rodents or insects, or excessive dust and debris actually being released from the supply registers. That’s not a suggestion; it’s a clear call to action.
Dirty ducts also force your system to work harder. A layer of dust on the interior surfaces acts as insulation, reducing the efficiency of heat transfer. Your blower has to push air through a narrower effective diameter when debris accumulates. The result: higher energy consumption and shorter equipment lifespan. The U.S. Department of Energy estimates that a typical household spends about half of its energy bill on heating and cooling. Even a small efficiency loss translates into real dollars.
Indoor air quality suffers too. The Environmental Protection Agency ranks indoor air pollution among the top five environmental health risks. Airborne contaminants like dust mites, pollen, and pet dander get stirred up every time the system cycles. For people with respiratory health conditions — asthma, COPD, or allergies — that’s not a minor inconvenience. It’s a daily trigger.
How Often Should You Actually Clean Your Air Ducts?
The National Air Duct Cleaners Association (NADCA) recommends cleaning every three to five years. That’s a reasonable baseline for a typical home with no special circumstances. But your situation might differ, and the difference matters more than the average.
Consider these factors when setting your own maintenance schedule:
- Pets: Two dogs and a cat mean more dander and hair in the air stream. Plan on cleaning every two to three years.
- Renovations: Drywall dust, sawdust, and construction debris are brutal on ductwork. Schedule a cleaning immediately after any major remodeling project.
- Smokers: Tobacco smoke leaves a sticky residue inside ducts that traps other particles. Clean every two years or less.
- Allergies or asthma: If anyone in the household has significant respiratory issues, err on the side of more frequent cleaning.
- New home purchase: You don’t know the history. Get the ducts inspected and cleaned before you move in.
Here’s a critical nuance most articles skip: frequency isn’t the only variable. The quality of your air filter and how often you change it plays a huge role. A MERV 11 filter changed every 90 days catches far more debris than a MERV 4 filter left in place for six months. If you’re diligent with filter changes, you can extend the interval between professional cleanings. If you’re not, you’ll pay for it later.
One more thing: duct cleaning is not an annual ritual like changing the oil in your car. Over-cleaning wastes money and, in rare cases, can disturb settled debris that wasn’t causing problems. The goal is to clean when there’s a genuine need, not on a rigid calendar.
The Warning Signs: When to Schedule a Cleaning Immediately
Some conditions don’t wait for a three-year cycle. If you notice any of the following, schedule a professional inspection within weeks, not months.
Visual and Odor Cues You Shouldn’t Ignore
- Visible mold growth: Look inside the air handler, on the cooling coil, or in the duct panels near the unit. Black or green patches are a red flag. Mold spores spread through the ventilation system and can cause serious respiratory health problems.
- Rodent or insect infestation: Droppings, nests, or dead pests in the ductwork or around the registers. This is a health hazard, not just an aesthetic issue. The debris from pests can carry pathogens.
- Excessive dust exiting the vents: Run the system for a few minutes, then wipe the inside of a supply register with a white cloth. If it comes away dark with dust, your ducts are releasing debris into the living space.
- Musty or moldy odors: A persistent smell that doesn’t go away with cleaning or air fresheners often originates inside the ductwork. It could be mold, mildew, or a dead animal.
- Unexplained allergy flare-ups: If family members experience worsening symptoms at home but feel better when they leave, the indoor air quality is suspect.
One sign that people frequently misunderstand: a whistling sound from the ducts. That’s usually a leak or a loose panel, not a dirt problem. You might need duct sealing rather than cleaning. A good technician will tell you the difference.
The Real Cost of Duct Cleaning (And How to Avoid Being Overcharged)
Pricing for duct cleaning varies wildly, and that’s where many homeowners get burned. You might see ads for $49 whole-house specials. Those are almost always bait. The company shows up, does a token vacuum of the main trunk line, and then tries to upsell you on ‘sanitizing’ or ‘encapsulation’ treatments that cost hundreds more.
Here’s a realistic breakdown. A typical single-family home with 2,000 to 2,500 square feet of living space has roughly 8 to 12 supply registers and return air grilles. A reputable professional will charge between $300 and $500 for a complete cleaning of that system. The price depends on the number of vents, the accessibility of the ductwork, and whether the system includes flexible ducts that require more careful handling.
Some companies charge per vent — usually $25 to $35 per register. That’s a fair model if the quote is transparent. For a 10-vent system, you’d pay $250 to $350. Add a fee for the air handler and the return side, and you’re in the same range.
Be wary of any quote significantly below $200 for a full system. At that price, the company can’t afford to spend the two to four hours required for a proper job. They’re cutting corners, and you’ll end up with a cosmetic cleaning that does nothing for your indoor air quality.
On the other end, any quote above $800 should raise questions. Unless you have a massive home with a complex multi-zone system, that’s excessive. Get a second opinion before committing.
The table below compares typical service options and what you should expect for each:
| Service Option | Typical Cost Range | What It Includes | Best For |
|---|---|---|---|
| Full professional cleaning | $300 – $500 | Negative air machine, rotary brush agitation, HEPA vacuum, cleaning of registers and air handler | Homes with visible contamination or 3+ years since last cleaning |
| Per-vent pricing | $25 – $35 per vent | Same as above, billed per register | Homes where you want a transparent, itemized quote |
| DIY dryer vent cleaning | $30 – $60 for a kit | Brush rods, vacuum attachments, manual labor | Dryer vent lines only; not a substitute for full duct cleaning |
| Duct sanitizing (add-on) | $100 – $200 extra | EPA-registered antimicrobial spray applied after cleaning | Only after visible mold or microbial growth is confirmed |
| Duct sealing (separate service) | $500 – $1,500 | Sealing leaks with mastic or metal tape | Homes with high energy bills and poor airflow |
Don’t pay for sanitizing unless you have a confirmed mold problem. The EPA explicitly states that duct cleaning alone is usually sufficient; sanitizing is not a routine necessity. Some companies push it as a standard add-on, but it’s a profit center, not a medical requirement.
DIY Maintenance vs. Hiring a Professional
You don’t need a professional for every aspect of ductwork maintenance. Some tasks are straightforward and safe for a homeowner with basic tools. Others require specialized equipment and training. Knowing the difference saves you money without compromising your system.
Simple Tasks You Can Do Today
Change the air filter. This is the single most impactful thing you can do. Check it monthly and replace it every 90 days at minimum. If you have pets or allergies, go every 60 days. A clean filter catches debris before it ever reaches your ductwork.
Vacuum the supply registers and return air grilles. Remove the covers, wash them in warm soapy water, and vacuum the duct opening with a crevice tool. Do this every season. It prevents large debris from accumulating at the entry points.
Clean the dryer vent line. Lint buildup in the dryer vent is a fire hazard. A kit with flexible rods and a brush, like the Sealegend dryer vent cleaner, attaches to a drill and reaches the full length of the vent. Run the brush through, then use the vacuum attachment to pull out the loosened lint. This is a two-hour job, and it’s well within a homeowner’s capability.
Inspect the duct insulation. Look for gaps, tears, or areas where insulation has pulled away from the ducts. Exposed metal in an unconditioned attic or crawlspace loses energy. Reattach or replace insulation as needed.
What a Professional Service Should Include
A legitimate duct cleaning company will do far more than stick a vacuum hose into a register. Here’s what a thorough service looks like:
- Inspection first. The technician should inspect the entire system, including the air handler, coils, and all accessible ductwork, before starting any work.
- Negative air pressure. They should set up a negative air machine — a high-powered vacuum connected to the system that creates suction, preventing dislodged debris from escaping into your living space.
- Agitation. They should use a rotary brush or compressed air to loosen debris from the duct walls. Vacuuming alone doesn’t remove adhered dust.
- Component cleaning. The air handler, cooling coil, drain pan, and blower housing should be cleaned, not skipped.
- Register cleaning. All supply registers and return air grilles should be removed, cleaned, and replaced.
- Final inspection. The technician should show you before-and-after photos or walk you through the cleaned sections.
If a company offers to clean your ducts without setting up negative pressure, or if they refuse to show you the interior of the ducts after cleaning, that’s a red flag. Find someone else.
How to Verify a Thorough Cleaning Job
You don’t have to take the technician’s word for it. There are two simple checks you can perform after the service is complete.
The white cloth test. Turn the system on and let it run for 15 minutes. Take a clean white cloth, dampen it slightly, and wipe the interior surface of a supply register. The cloth should come away nearly clean. If there’s a gray or black residue, the cleaning wasn’t thorough, or the system is still shedding debris from elsewhere.
The visual inspection. Use a flashlight and look into the duct opening as far as you can see. The interior walls should show bare metal or the original duct liner, not a coating of dust. For a more thorough look, some homeowners use a borescope camera that attaches to a smartphone. These cost about $30 and let you see several feet into the ductwork. It’s a worthwhile investment if you plan to hire professionals regularly.
Also check the air handler area. After a proper cleaning, the blower housing and the surrounding area should be free of dust and debris. If the technician left a mess around the equipment, that’s a sign of sloppy work overall.
Preventing Future Contamination: A Seasonal Checklist
Clean ducts stay clean longer if you adopt a few habits. The best time to schedule a professional cleaning is spring or fall, when you’re not relying heavily on heating or cooling. That gives you a window to address any issues before extreme weather hits.
Here’s a seasonal maintenance schedule that works:
- Spring: Change the filter, vacuum all registers, check for condensation or moisture around the air handler, and schedule a professional cleaning if it’s been three years.
- Summer: Keep the area around the outdoor condenser clear of debris, check the condensate drain line for clogs, and change the filter mid-season.
- Fall: Before the first heating season, inspect the duct insulation, seal any visible gaps, and clean the dryer vent line.
- Winter: Change the filter at the start of the season, monitor for unusual odors when the heat first kicks on, and listen for changes in airflow.
One habit that pays off: after any home renovation, even a small one, run the HVAC system in fan-only mode for a few hours with the windows open. That helps push construction dust toward the filter rather than letting it settle in the ductwork. Change the filter immediately after.
If you have a dedicated home heating setup that also filters air, like a unit designed for pets, keeping the ductwork clean supports its performance. Check out this guide on clean air filtration heaters for more on that angle.
Frequently Asked Questions About Duct Hygiene
Does duct cleaning actually improve indoor air quality?
It can, but only when there’s a measurable contamination problem. If your ducts are relatively clean, a professional cleaning won’t dramatically change your air quality. The bigger factors are the air filter quality, ventilation rates, and sources of pollutants inside the home. Cleaning ducts removes settled debris; it doesn’t stop new particles from entering the air.
Can I clean my own ducts with a shop vacuum?
You can vacuum the registers and the first few feet of ductwork, but you won’t reach the deep sections without specialized equipment. A shop vacuum lacks the power and agitation needed to remove adhered dust. For the dryer vent, a purpose-built kit works fine. For the main HVAC ductwork, leave it to a professional.
How long does a professional duct cleaning take?
Expect two to four hours for a typical home. The time depends on the number of vents, the layout of the ductwork, and the level of contamination. A company that promises to finish in under an hour is probably not doing a thorough job.
Is duct sealing worth the extra cost?
If your ducts leak, sealing them can improve efficiency and comfort. Leaky ducts in unconditioned spaces can lose 20 to 30 percent of the heated or cooled air. But sealing is a separate service from cleaning. Have the ducts inspected first; if there are obvious gaps or disconnected sections, sealing is a good investment.
What’s the difference between duct cleaning and dryer vent cleaning?
Duct cleaning covers the HVAC system that heats and cools your home. Dryer vent cleaning is specifically for the exhaust line that removes hot, humid air from your clothes dryer. They require different tools and serve different purposes. A dryer vent cleaner kit handles the latter, while a professional HVAC technician handles the former.
What to Do With This Information
- Change your air filter every 60 to 90 days — this is the cheapest insurance for your ductwork.
- Schedule a professional duct inspection if you’ve never had one, especially if you bought the home used.
- Clean the dryer vent line with a kit like the Sealegend dryer vent cleaner at least once a year.
- Watch for the warning signs: visible mold, rodent droppings, excessive dust, or musty odors.
- Expect to pay $300 to $500 for a legitimate full-system cleaning; be suspicious of anything far cheaper.
- Verify the job with the white cloth test and a visual inspection before paying the final invoice.
- Plan your cleaning schedule around spring or fall, when the HVAC system isn’t under heavy load.
Your ductwork doesn’t need constant attention, but it does need periodic care. A few hours of maintenance each year prevents the kind of problems that cost thousands to fix later. Start with the filter, then move to the dryer vent, and you’ll have covered the most common failure points before they become real issues.

HeaterGuides covers home heating, water heating and HVAC: how the equipment works, what it costs to run, and how to use it safely.
