

Walk through any older factory and you’ll see the same scene: a row of analog thermostats, a maintenance tech with a clipboard, and a supervisor hoping the overnight shift didn’t cook a batch of product. Temperature control in industrial settings has been stuck in that reactive loop for decades. You only notice the problem after it costs you money.
Smart temperature control flips that model. Instead of waiting for a temperature excursion to ruin a batch or trigger a shutdown, you catch drift early, adjust in real time, and know exactly what’s happening across every zone in your plant. This article walks through the practical side of implementing IoT-based temperature control: the hardware you actually need, how to retrofit old equipment, what the ROI looks like, and where the security risks hide. You’ll leave with a concrete plan, not just a list of buzzwords.
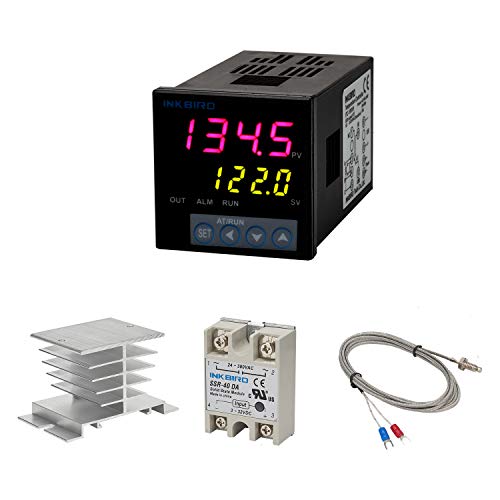
Inkbird
Inkbird PID Temperature Controller Kit, High Voltage…
- Alarm Output: With 1 alarm relay output, AC250 V, 3 A (Resistive load), ON or NC, you can wire a buzzer
- Supports 3-Wire Sensor: a 3-wire sensor or 2-wire sensor, like the K type thermocouple and Cu500, is supported by this PID tempera…
- SSR Output: With 1 relay output for external SSR, an SSR or relay is a must for this temperature controller; A 40DA SSR is include…
If you’re starting small or testing on a single machine, a reliable PID controller is the right foundation. The Inkbird PID Temperature Controller Kit handles 100–240 VAC, supports K-type thermocouples and Cu500 sensors, and includes a 40DA SSR so you can drive a heating element right away. It shows actual temperature and setpoint simultaneously, which makes tuning and troubleshooting far less painful.
The Hidden Cost of Inefficient Temperature Control in Factories
Temperature drift doesn’t announce itself. A 5°C excursion in a plastics extrusion line can change the viscosity of the melt, producing parts that fail dimensional inspection. A slow drift in a food pasteurization tank might not trigger an alarm, but it shortens shelf life and risks a recall. These failures look like quality problems, but they’re really control problems.
The financial impact stacks up quietly. Energy waste is the easiest to calculate: a poorly tuned controller cycles a heater or chiller more often than needed, and that extra cycling burns electricity. A 100 kW heating load running 10% longer than necessary costs roughly $8,000 per year at $0.09/kWh. That’s one line. One machine.
Then add rejected batches. A single spoiled batch of pharmaceutical intermediate might be worth tens of thousands of dollars. Scrap rates in plastics, rubber, and food processing often hover between 2% and 5% when temperature control is loose. Cutting that in half pays for a full IoT deployment within months.
The third cost is maintenance. Thermal stress from frequent overshoot and undershoot wears out heating elements, compressors, and valves. Predictive maintenance from continuous monitoring catches bearing wear and refrigerant loss before they cause unplanned downtime. One avoided 8-hour shutdown at $1,200/hour in lost production covers a lot of sensor hardware.
Core Components of a Smart Temperature Control System
You don’t need a complete plant-wide overhaul to get value. Start with the four building blocks and scale from there.
Sensors: Types, Placement, and Calibration
Thermocouples (Type K, J, T) are the workhorses. They’re cheap, rugged, and cover a wide range. But they drift. A Type K thermocouple can drift by 1–2°C per year in continuous service at high temperature. RTDs (Pt100, Pt1000) are more stable and accurate, typically ±0.1°C, but they cost more and respond slower. Infrared sensors work well for moving surfaces or non-contact measurements, but emissivity variations can fool them.
Placement matters more than sensor type. A sensor mounted too close to a heater sees the heater, not the product. Mount it too far away and you introduce lag. The rule of thumb: place the sensor where the product temperature matters, not where the sensor is easiest to install. In a plastic extruder, that means inside the melt stream, not on the barrel surface.
Calibration is the part everyone skips. Plan a calibration schedule based on your tolerance. If your process allows ±1°C, calibrate every 6 months. If you’re running pharmaceutical or food processes with ±0.5°C requirements, calibrate quarterly. Use a dry-block calibrator or a certified reference bath. Log every calibration result; that data becomes part of your quality documentation and your predictive maintenance model.
Gateways and Connectivity: Choosing the Right Protocol
Your sensors produce data. The gateway collects it and sends it somewhere useful. The protocol choice depends on distance, data volume, and how much latency you can tolerate.
Wi-Fi is fine for short distances (under 100 meters) and high data rates, but it’s power-hungry and can be congested in a factory full of metal racks and moving equipment. Bluetooth Low Energy (BLE) works for short-range sensor networks but has limited range and reliability issues in industrial environments.
LoRaWAN is the sweet spot for temperature monitoring. It transmits over kilometers, penetrates walls and machinery, and sips power. A battery-powered LoRaWAN sensor can run for years. The tradeoff is low bandwidth — you’re sending a few bytes per message, which is plenty for a temperature reading every few minutes. Semtech’s smart industrial IoT solutions show how LoRaWAN fits into factory environments without rewiring everything.
5G and 4G LTE cellular are options when you need high bandwidth or you’re monitoring assets across multiple sites. They cost more per device and consume more power. For fixed factory sensors, they’re usually overkill.
Ethernet remains the most reliable for control loops that need sub-second response. If you’re closing a PID loop, keep it on wired Ethernet or a fieldbus like Modbus TCP. Wireless is for monitoring and supervisory control, not for safety-critical regulation.
Edge vs. Cloud: Where Data Processing Happens
Cloud processing gives you dashboards, historical trends, and machine learning. But sending every temperature reading to the cloud creates latency and dependency. Edge processing keeps the control loop local — the PID controller runs on the PLC or a dedicated edge gateway — and only sends summaries and alarms to the cloud.
For most factories, the right architecture is hybrid. The PID loop stays local, running at 100 ms or faster. The edge gateway aggregates data, detects anomalies, and forwards compressed trends to the cloud every minute. If the internet drops, your process keeps running. The cloud becomes the reporting layer, not the control brain.
From Data to Action: Implementing Predictive Temperature Control
Collecting data is not the same as using it. A thousand temperature readings per minute are useless unless you convert them into decisions. Predictive control means the system learns normal behavior and flags deviations before they become failures.
Start by establishing a baseline. Run your process for two weeks with the new sensors in place. Record temperature profiles for each zone, including normal variation during startup, steady state, and shutdown. This baseline becomes your reference.
Next, set thresholds. A simple approach: flag any reading that exceeds three standard deviations from the historical mean for that zone. That catches real anomalies without drowning you in false alarms. For tighter control, use a moving window — compare the last 10 minutes of data against the same time window from the previous week.
Then close the loop. The edge gateway can adjust setpoints automatically based on trends. If a zone is slowly drifting upward, the controller can trim the heater output before the product quality degrades. This is where you see the real savings: less overshoot, less energy waste, fewer rejected batches.
One caution: don’t let the algorithm run wild. Put hard limits on how much the system can adjust setpoints autonomously. For a process with a 200°C setpoint, allow the system to adjust ±5°C on its own. Anything beyond that requires a human approval.
Retrofitting Legacy Equipment: A Practical Integration Guide
Most factories aren’t greenfield. You have aging extruders, ovens, and tanks with old controllers. Retrofitting them with IoT temperature control is possible, and you don’t need to replace the whole machine.
Step 1: Audit the existing control loop. Identify the current sensor, controller, and actuator. Is the sensor a thermocouple or RTD? Does the controller output to a relay, SSR, or analog signal? What’s the actuator — a heater, a valve, a fan?
Step 2: Choose the interface. If your existing controller has a 4–20 mA or 0–10 V output, you can add a smart gateway that reads that signal and transmits it wirelessly. No need to touch the existing loop. If the controller is completely isolated, add a separate sensor and a smart PID controller in parallel. The Inkbird unit mentioned earlier works well here because it accepts standard thermocouples and drives an SSR directly.
Step 3: Install the sensor. Mount a new sensor at the product location, not at the machine surface. Route the wire away from power cables to avoid electrical noise. Use shielded twisted-pair cable for thermocouples and RTDs.
Step 4: Connect the gateway. Place a LoRaWAN gateway or Wi-Fi access point within range. Power it with PoE or a 24 V supply. Configure it to read your sensor protocol (Modbus RTU is common) and forward data to your edge gateway or cloud platform.
Step 5: Commission and test. Run the machine through a complete cycle. Compare the smart sensor readings against a calibrated handheld reference. Verify that alarms trigger correctly and that the dashboard updates in real time. Budget a day for this step; rushing it creates false confidence.
Step 6: Document everything. Draw a wiring diagram, note the sensor locations, and record the calibration date. Future maintenance depends on this documentation.
Securing Your Temperature Network Against Cyber Threats
Adding sensors and gateways expands your attack surface. A compromised temperature controller can ruin a batch, or worse, create a safety hazard. Security isn’t optional.
Segment your network. Put IoT devices on a separate VLAN from your business network and your control network. Use firewalls to restrict traffic between segments. A sensor should only talk to its gateway, not to the internet.
Change default credentials on every device. This sounds obvious, but factory floors are full of devices still using ‘admin/admin’. Use unique, strong passwords per device, and store them in a password manager.
Encrypt communications. Use TLS or DTLS for data in transit. LoRaWAN has built-in AES-128 encryption, which is one reason it’s preferable to raw Wi-Fi for sensitive data. For Modbus TCP, use a VPN tunnel or an encrypted gateway.
Update firmware regularly. Many industrial devices have known vulnerabilities that get patched. Set a quarterly schedule to check for and apply firmware updates. Test updates on a non-production device first.
Monitor for anomalies. Your security system should flag unusual traffic patterns — a sensor that starts sending data at 3 a.m. when it never did before is a red flag. Integrate your IoT gateway logs into your existing SIEM if you have one.
Measuring Success: KPIs and ROI for Your Investment
You need numbers to justify the project and to prove it worked. Track these KPIs before and after deployment.
Energy consumption per unit of production is the most direct metric. Measure kWh per 1,000 units produced, or per ton of throughput. A well-tuned system typically cuts energy use 10–20% on thermal processes.
Scrap and rework rate. Count the percentage of batches that fail quality inspection due to temperature-related issues. Aim for a 50% reduction in the first year.
Equipment uptime. Track unplanned downtime hours per month. Predictive maintenance from temperature monitoring should catch failures before they cause shutdowns.
Payback period math is straightforward. Add up your hardware costs: sensors at $50–$150 each, gateways at $200–$500, a controller at $50–$100, plus installation labor. Compare that to monthly savings from reduced energy, scrap, and downtime.
Here’s a realistic example. A factory with 20 temperature zones spends $25,000 on sensors, gateways, and installation. They cut energy use by 12%, saving $1,800 per month. They cut scrap from 3% to 1.5%, saving another $2,200 per month. Total monthly savings: $4,000. Payback period: just over 6 months. That’s typical for a well-scoped project.
| Method | Initial Cost | Energy Savings | Payback | Best For |
|---|---|---|---|---|
| Manual control with periodic checks | $0 | 0% | N/A | Processes with wide tolerances |
| Standalone PID controller | $50–$150 per zone | 5–10% | 6–12 months | Single machines, simple loops |
| IoT monitoring + manual adjustment | $500–$2,000 per zone | 8–15% | 6–18 months | Multi-zone facilities, visibility needs |
| Full IoT with predictive control | $2,000–$5,000 per zone | 15–25% | 12–24 months | Large plants with high energy costs |
Real-World Case Study: Cutting Energy Costs by 20% in a Plastics Plant
A mid-sized plastics injection molding plant in Ohio ran 14 molding machines, each with barrel heaters controlled by aging analog thermostats. The plant manager knew the temperature control was sloppy — the operators constantly adjusted setpoints manually to compensate for drift.
They installed a LoRaWAN-based monitoring system with Type K thermocouples on each barrel zone, plus a smart PID controller on each machine. The gateway collected data every 30 seconds and sent it to a cloud dashboard. The plant kept the existing heaters and only replaced the controllers and added sensors.
Within the first month, the dashboard revealed that three machines were cycling their heaters far more than necessary. The thermocouples had drifted, causing the controllers to overshoot by 8–10°C. After recalibration and retuning the PID loops, those machines ran 18% more efficiently.
Over six months, the plant cut overall energy consumption for barrel heating by 20%. Scrap rate dropped from 2.8% to 1.4% because the melt temperature stayed within a tighter window. The total project cost was $38,000, including installation and training. Monthly savings averaged $6,500, placing the payback at just under six months.
The operators were skeptical at first — they’d been adjusting knobs for years. But once the dashboard showed them real-time melt temperature trends, they trusted it. The plant manager now reviews the weekly energy report from his phone.
Future-Proofing Your Factory: AI and Machine Learning in Temperature Control
Machine learning isn’t magic, but it does find patterns humans miss. A well-trained model can predict a heater failure weeks before it happens by detecting subtle changes in the temperature response curve.
Start with a simple model. Feed it historical temperature data, setpoint changes, and ambient conditions. Train it to predict the temperature at the next time step. When the actual reading deviates from the prediction beyond a threshold, flag it. This catches sensor drift, heater degradation, and insulation breakdown early.
More advanced models optimize setpoints in real time. For a multi-zone oven, the model can adjust each zone’s setpoint to minimize energy use while keeping the product within spec. This is where the 20–25% energy savings come from, but it requires a solid data history and a process that’s already well-controlled.
Don’t skip the fundamentals first. AI won’t fix a poorly tuned PID loop or a mislocated sensor. Get the basics right, collect clean data for at least three months, and then consider machine learning.
One more note: keep humans in the loop. An AI that adjusts setpoints autonomously needs oversight. Set clear boundaries for how much it can change, and require a human review for any change beyond those limits. The goal is to make your operators better, not to replace them.
Your Next Steps Toward a Smarter Factory
- Start with one machine or one zone. Prove the concept and the ROI before scaling plant-wide.
- Choose sensors based on your accuracy needs and environment. RTDs for precision, thermocouples for cost and range.
- Use LoRaWAN for wireless temperature monitoring — it’s reliable, secure, and battery-friendly.
- Keep the PID loop local and the monitoring cloud-based. Don’t depend on internet for control.
- Calibrate on a schedule. Drift is real and it will erode your quality and efficiency.
- Segment your network and change default passwords. Security is part of the deployment, not an afterthought.
- Track energy per unit, scrap rate, and uptime before and after. Let the numbers justify your next investment.
For more context on how these systems fit together, check out this smart temperature control guide and the data-driven approach to industrial processes. The technology is mature, the costs are reasonable, and the payback is real. The only question is when you start.

I am a mechanical engineer and love doing research on different home and outdoor heating options. When I am not working, I love spending time with my family and friends. I also enjoy blogging about my findings and helping others to find the best heating options for their needs.
Related guides
Industrial Oven Temperature Control Methods & Tips
Getting temperature right in an industrial oven isn't just about setting a dial. It's the foundation of your…

How Industrial Temperature Control Impacts Our Environment
Industrial temperature variations can lead to increased energy consumption, greenhouse gas emissions, and altered ecosystems, negatively impacting air…
Master Temperature Control for Thriving Plants Year-Round
To implement temperature control in plants, use thermostats, shade cloths, and ventilation systems to maintain optimal growing conditions.…
