

It’s 2 AM, the temperature dropped to 18°F, and your sleeping bag feels like a damp envelope. You can see your breath. The tent walls are slick with condensation. You’ve got another six hours before sunrise, and every minute of it will be miserable. Most campers have been there. The problem isn’t the cold itself—it’s that most advice about heating a tent is either useless or outright dangerous.
This guide cuts through the noise. You’ll learn exactly which heating methods work, which ones will kill you, and how to calculate the right heat output for your specific tent. You’ll also get a clear picture of the trade-offs between weight, cost, and safety so you can make a smart choice for your camping style. By the end, you’ll know how to stay warm without turning your shelter into a fire hazard.
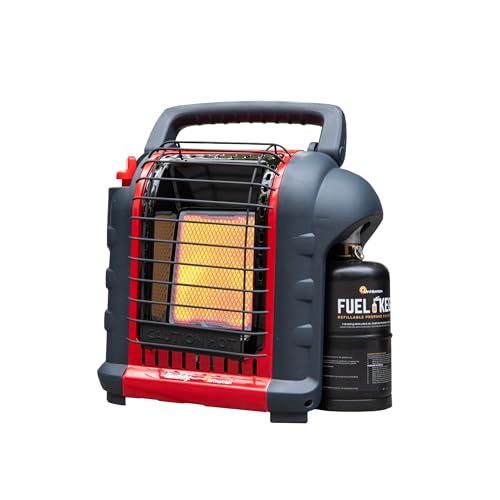
Mr. Heater
Mr. Heater 9,000 BTU Portable Buddy Radiant…
- Emits 4,000 or 9,000 BTU/hr radiant heat
- Designed and approved for indoor and outdoor use
- Heats up to approximately 225 square feet
One piece of gear that solves the most common heating problem—staying warm in a large tent during car camping—is the Mr. Heater 9,000 BTU Portable Buddy Radiant Propane Heater. It’s designed for indoor use, which is rare, and it has a low-oxygen shutoff. We’ll get into why that matters later.

Why Most Tent Heating Advice is Dangerous (and What to Do Instead)
Most online advice tells you to use a candle lantern or a hot water bottle. Those are fine for taking the edge off, but they won’t keep you warm in serious cold. The dangerous advice involves open flames, charcoal, or DIY alcohol stoves inside a tent. Carbon monoxide is invisible, odorless, and lethal. A single candle won’t produce enough CO to hurt you, but a propane stove or charcoal briquette absolutely will.
The core problem is that people don’t understand the difference between a heat source that burns with a flame and one that burns cleanly. Propane heaters designed for indoor use have safety sensors. Open flames don’t. If you’re going to heat a tent, you need a system with a safety margin, not a hack.
So what’s the alternative? Use a heater designed for the purpose, maintain proper ventilation, and manage moisture. That’s the whole game. Everything else is details.
The Golden Rules of Tent Heating: Ventilation, Clearance, and Monitoring
Before you buy anything, learn these three rules. They apply to every heating method on the market.
Ventilation is Non-Negotiable
Even a “safe” propane heater consumes oxygen and produces carbon monoxide. The Mr. Heater Buddy has a low-oxygen shutoff, but that’s a last resort, not a plan. You need a vent. Crack a window or leave the door partially unzipped. This sounds counterintuitive—you’re trying to keep heat in—but a small vent allows fresh air in and lets moisture escape. The heat you lose through a 2-inch gap is far less than the heat you lose from hypothermia.
Clearance Matters More Than You Think
Radiant heaters throw heat in a specific direction. Anything flammable within that line of sight can ignite. Keep at least 3 feet of clearance around the heater. That means no sleeping bags, no jackets, no tent walls directly touching the unit. A sleeping bag draped over a heater is a fire waiting to happen. Check the tent fabric temperature near the heater after 10 minutes. If it’s hot to the touch, move the heater.
Monitoring Means Staying Awake
You should never run a propane heater while you’re asleep. It’s tempting, but it’s the single most dangerous thing you can do. The heater burns oxygen, and if the tent runs out of breathable air, the low-oxygen shutoff might save you—or it might not. Run the heater for 30-45 minutes before bed to warm the space, then shut it off and crawl into your sleeping bag. You’ll retain that heat for hours.
The 4 Best Ways to Heat a Tent (Ranked by Safety and Efficiency)
Here’s the honest ranking based on real-world use. Your specific situation might change the order, but this is a solid starting point.
Method 1: Propane Radiant Heaters (Best for Car Camping)
This is the most popular option for good reason. A propane radiant heater like the Mr. Heater Buddy puts out serious heat—up to 9,000 BTU/hr—and runs on the small 1-pound propane cylinders. It’s heavy (around 9 pounds) and bulky, so it’s not for backpacking. But if you’re driving to your campsite, it’s the best balance of cost, heat output, and safety.
The key feature is the low-oxygen safety system. This sensor shuts the heater off if the oxygen level in the tent drops below 18%. That’s a real safety net, not a marketing gimmick. You still need ventilation, but the sensor adds a layer of protection.
You’ll get about 2-3 hours of heat on the 9,000 BTU setting from a single 1-pound cylinder. That’s enough to warm up the tent before bed and again in the morning. For longer use, you can buy a hose adapter to connect a 20-pound grill tank, which is far more economical. Just keep the tank outside the tent.
Method 2: Wood-Burning Stoves (Best for Extreme Cold)
If you’re camping in temperatures below 0°F, a wood stove is the only method that can keep a tent truly warm for hours. These stoves are small, lightweight (10-20 pounds), and designed to be used inside canvas or hot-tent style shelters. They produce dry heat, which means less condensation.
The downsides are real. You need a tent with a stove jack—a fireproof opening in the roof for the chimney. Setting up the stove and chimney correctly takes practice. You also need a reliable source of dry firewood, which is not guaranteed in winter. And you must stay awake to feed the fire. But for a base camp in deep winter, nothing else compares.
Method 3: Electric Heaters (Best for Glamping with Hookups)
If you have access to shore power at a campground, an electric space heater is the safest option. No carbon monoxide, no open flame, no oxygen consumption. A 1,500-watt ceramic heater can warm a large tent effectively, and you can run it all night without fear.
The catch is that you need a power source. Most standard campsites provide 15-amp or 30-amp hookups. A 1,500-watt heater draws about 12.5 amps, so it will work on a 15-amp circuit but won’t leave much room for other devices. Use a heavy-duty extension cord rated for outdoor use. Never daisy-chain cords.
Method 4: Battery-Powered Options (Best for Emergency Backup)
Battery-powered heaters are the weakest option in terms of raw heat output. Most put out 100-300 watts, which is barely enough to warm a small enclosed space. They’re useful for taking the chill off a sleeping bag or heating a tiny one-person tent, but they won’t save you in freezing conditions.
The real value is safety. No fuel, no fumes, no fire risk. If you’re car camping and have a large power station (like a Jackery or Goal Zero), a 12-volt heated blanket is a better bet than a space heater. It uses less power and puts heat directly where you need it.
The “No-Go” Zone: Methods You Should Never Use
Some methods appear in every camping forum but should never be used inside a tent. Here’s the list.
- Candles: A single candle produces minimal heat and creates a serious fire risk. A candle lantern is marginally safer but still an open flame. If a tent wall touches it, you have a hole in your shelter and a potential wildfire.
- Open-flame alcohol stoves: These are designed for cooking, not heating. They produce carbon monoxide and can flare up unpredictably. Never run one for heat.
- Charcoal or wood in a metal bucket: This is the most lethal method. Charcoal produces massive amounts of carbon monoxide. You will not wake up. This method kills people every year.
- Hot rocks from the fire: Heating rocks in a campfire and bringing them into the tent is dangerous. Rocks can explode when heated due to trapped moisture. The risk isn’t worth the warmth.
How to Calculate the Right Heater Size for Your Tent
You don’t need a degree in thermodynamics, but you need to understand the basic math. Heat output is measured in BTUs (British Thermal Units). One BTU raises the temperature of one pound of water by one degree Fahrenheit. For tent heating, the rule of thumb is about 20 BTUs per square foot of floor space for moderate cold (32°F), and 30-40 BTUs per square foot for extreme cold (below 20°F).
Here’s a practical example. A typical 4-person tent has about 60 square feet of floor space. For a 32°F night, you need 60 x 20 = 1,200 BTUs. The Mr. Heater Buddy on its low setting (4,000 BTUs) is more than enough. For a 6-person tent with 80 square feet, you’d need 1,600 BTUs on a moderate night, so the Buddy on low works. For a 0°F night in that same tent, you’d want 80 x 35 = 2,800 BTUs, which means running the Buddy on high (9,000 BTUs) to get a comfortable margin.
Don’t overthink it. Most campers overheat their tents. Running a 9,000 BTU heater in a small tent will make it uncomfortably hot and create massive condensation. Start on the low setting and adjust.
The Insulation Strategy: How to Retain Heat Once You Create It
Heating a tent is only half the battle. The other half is keeping that heat from escaping. A tent is essentially a thin nylon shell. It has almost no insulation value. Your body heat and any heater heat will radiate out through the walls and floor.
The most effective insulation is a thermal blanket under your sleeping pad. A reflective emergency blanket (the silver mylar kind) placed under your sleeping pad reflects your body heat back up at you. It costs $2 and weighs almost nothing. Place it between the tent floor and your pad. This alone can add 5-10°F of warmth.
Another trick is to use a sleeping bag liner made of fleece or silk. This adds insulation without the bulk. And always use a sleeping pad with a good R-value. A foam pad with an R-value of 2.0 is fine for summer, but winter camping demands an R-value of 4.0 or higher. Your sleeping bag compresses under your body, so the pad is doing most of the work.
You can also rig a simple heat reflector. Place a piece of reflective foil (like Reflectix) behind the heater to bounce radiant heat back into the tent instead of letting it absorb into the wall.
Managing Condensation: The Hidden Enemy of Warmth
Condensation is the #1 killer of comfort in a heated tent. When you breathe, you exhale moisture. When you cook or run a propane heater, you add more moisture. This water vapor hits the cold tent walls and condenses into liquid. A wet tent loses heat faster than a dry one, and a wet sleeping bag is a dangerous thing.
You can’t eliminate condensation entirely, but you can manage it. First, ventilate. Crack a window or unzip the door a few inches. This lets moist air escape. Second, dry your gear before entering the tent. Shake off snow and rain outside. Third, use a moisture-absorbing product like a desiccant pack or a towel to wipe down the walls in the morning.
Here’s a comparison of the main heating methods based on the factors that matter most:
| Method | Heat Output (BTU/hr) | Weight | Cost per Night | Fire Risk | CO Risk | Best For |
|---|---|---|---|---|---|---|
| Propane Radiant | 4,000-9,000 | 9-10 lbs | $5-8 (1-lb cylinder) | Low (with clearance) | Low (with ventilation) | Car camping, large tents |
| Wood Stove | 5,000-15,000 | 15-25 lbs | Free (if you find wood) | Medium (needs skill) | None (vented) | Extreme cold, base camps |
| Electric | 3,400-5,100 | 2-5 lbs | $1-3 (electricity) | Very Low | None | Glamping, hookups |
| Battery Heated Blanket | 100-300 | 1-2 lbs | $0 (rechargeable) | None | None | Emergency backup, small tents |
Final Safety Checklist Before You Crawl Into Your Sleeping Bag
Run through this list every time you set up your heating system. It takes two minutes and could save your life.
- Check that your carbon monoxide detector has fresh batteries. If you don’t own one, buy one. They cost less than $30 and work in tents.
- Confirm the heater has at least 3 feet of clearance from all flammable materials.
- Crack a vent. Even if it’s cold, do it.
- Test the heating setup at home before your trip. Set up the tent in your backyard, run the heater, and check for hot spots on the fabric.
- Never run a propane heater while sleeping. Use it to pre-warm, then shut it off.
- Keep a fire extinguisher or a bucket of water near the tent entrance.
- Know the signs of carbon monoxide poisoning: headache, dizziness, nausea, confusion. If anyone feels off, get outside immediately.
Frequently Asked Questions
Can I use a regular propane camp stove to heat my tent?
No. Camp stoves are designed for cooking, not heating. They produce carbon monoxide and their open flame is a fire hazard. Use a heater specifically designed for indoor use, like the Mr. Heater Buddy, which has a low-oxygen shutoff.
How much ventilation do I actually need with a propane heater?
You need a gap of at least 1-2 inches, like a partially unzipped door or an open vent window. This allows fresh oxygen in and lets moisture escape. Without it, you risk carbon monoxide buildup and excessive condensation.
Is it safe to run a propane heater all night?
No. Even with a low-oxygen shutoff, the risk of malfunction or accidental tip-over is too high. Use the heater to warm the tent for 30-45 minutes before bed, then turn it off. Your sleeping bag and pad will retain that heat.
What’s the best way to heat a tent for backpacking?
You don’t heat the tent. You heat yourself. Use a high-R-value sleeping pad, a warm sleeping bag rated for the conditions, and a hot water bottle in a sock at the bottom of your bag. Carrying a heater adds too much weight for backpacking.
Why is my tent so wet inside even with a heater?
That’s condensation from your breath and the heater’s combustion. The fix is more ventilation, not less. Also, dry your gear outside the tent before bringing it in, and wipe down the walls with a towel in the morning.
What to Do Next
You now have the full picture. The best way to heat a tent depends on your situation, but the safest and most practical method for most car campers is a propane radiant heater with a low-oxygen sensor. Pair it with a good sleeping pad, a thermal blanket underneath, and a vent cracked open.
Before your next trip, run a test setup in your backyard. Check the heater’s clearance, measure the temperature rise, and see how much condensation you get. That practice will make you more confident and safer in the field.
For a deeper look at choosing the right gear, check out this tent heating guide that covers more options. And if you’re dealing with cold weather in other structures, this uninsulated garage heater guide has some transferable principles. Stay warm, stay safe, and get out there.

I am a mechanical engineer and love doing research on different home and outdoor heating options. When I am not working, I love spending time with my family and friends. I also enjoy blogging about my findings and helping others to find the best heating options for their needs.
Related guides

Best Bathroom Heater: Safe & Efficient Options for Warmth
The best type of heater for a bathroom is a wall-mounted electric heater, as it provides efficient, safe,…
Best 16 SEER Heat Pump: A Game Changer for My Home!
Looking for the best 16 SEER heat pump? Compare top models and find the perfect energy-efficient solution for…
Best Tires for Heat and Rain – You Won’t Regret This Choice!
Stay safe on the road with the best tires for heat and rain. Find top picks to boost…
